Transform your outdoor space with artificial grass installation that delivers lasting beauty without the hassle of traditional lawn maintenance. This synthetic turf revolution eliminates weekly mowing, constant watering, and seasonal fertilizing while maintaining pristine appearance year-round.
The process of installing artificial grass requires careful planning and precise execution to achieve professional results. Each step builds upon the previous one, creating a foundation that ensures proper drainage, prevents settling, and maintains natural appearance for decades.
This guide provides comprehensive instructions for artificial grass installation, from initial site preparation through final touches. Whether you tackle this project yourself or hire professionals, understanding each phase helps ensure success.
Tools and materials for artificial grass installation
Successful artificial grass installation begins with proper preparation. Gather these essential items before starting your project.
Required tools
- Cutting equipment: Sharp utility knives or heavy-duty scissors handle precise trimming around borders, obstacles, and seams. Quality cutting tools prevent fraying and create clean edges that look professional.
- Excavation tools: Shovels and spades remove existing vegetation and create proper depth for base materials. Choose tools with sharp edges for efficient soil cutting and removal.
- Leveling equipment: Garden rakes distribute materials evenly and create smooth surfaces. Steel-tined rakes work best for breaking up soil clumps and achieving consistent grades.
- Measuring equipment: Accurate measuring tapes ensure proper material calculations and precise cuts. Metal tapes resist stretching and provide reliable measurements throughout the project.
- Transportation: Wheelbarrows move heavy materials efficiently around the installation site. Choose models with pneumatic tires for easier maneuvering over rough terrain.
- Fastening tools: Staple guns or hammer tackers secure turf edges and seams. Commercial-grade tools handle repeated use and provide consistent fastening strength.
- Compaction equipment: Hand tampers or plate compactors create stable foundations. Proper compaction prevents future settling and maintains level surfaces.
- Finishing tools: Stiff-bristled brooms distribute infill materials and lift grass fibers. Power brushes work faster on large installations but require careful technique.
Required materials
- Synthetic turf: Select artificial grass based on intended use, traffic patterns, and aesthetic preferences. Consider pile height, fiber density, and backing material quality for optimal performance.
- Foundation materials: Crushed stone or decomposed granite creates stable, well-draining bases. Use angular materials that compact well and resist shifting over time.
- Infill products: Silica sand or rubber granules add weight, improve drainage, and enhance turf performance. Choose infill types based on usage requirements and local climate conditions.
- Barrier systems: Geotextile fabric prevents weed growth and separates turf from soil. Quality fabrics resist punctures while allowing water infiltration.
- Edge materials: Flexible or rigid edging defines installation boundaries and prevents turf movement. Select materials that complement surrounding landscape features.
- Joining systems: Seaming tapes and adhesives create invisible joints between turf sections. Use manufacturer-approved products for warranty compliance and optimal bonding.
- Fasteners: Landscape staples and turf nails provide secure attachment points. Galvanized or stainless steel fasteners resist corrosion in wet conditions.
How to install artificial grass
Follow these detailed instructions to install artificial grass with professional-quality results that last decades.
Step 1: Site preparation
Remove all existing vegetation, including grass, weeds, and root systems. Excavate the area to 3-4 inches below final grade to accommodate base materials while maintaining proper elevation relative to adjacent surfaces.
Clear all debris, rocks, and organic matter that could cause future settling or drainage problems. Pay special attention to removing tree roots and underground obstacles that might puncture turf backing.
Step 2: Grade establishment and barrier installation
Create proper drainage slopes using a garden rake, ensuring water flows away from structures toward appropriate drainage areas. Slopes should drop 1-2% minimum for effective water management.
Install geotextile fabric across the entire area, overlapping seams by 6 inches minimum. Secure fabric with landscape staples every 3 feet along edges and seams to prevent shifting during base installation.
Step 3: Soil compaction
Compact exposed soil using appropriate equipment based on soil type and moisture content. Make multiple passes with hand tampers or mechanical compactors, focusing extra attention on previously disturbed areas.
Test compaction by walking across the surface – properly compacted soil shows minimal footprint depression. Address soft spots with additional compaction before proceeding to base installation.
Step 4: Base material installation
Spread decomposed granite or crushed stone base material evenly across the prepared area. Maintain consistent 3-4 inch depth while preserving drainage slopes established during grading.
Use rakes to level base materials, breaking up clumps and filling low spots. Work systematically across the installation area to achieve uniform depth and smooth transitions.
Step 5: Base compaction and drainage testing
Compact base materials thoroughly using mechanical equipment, making multiple passes in different directions. Properly compacted bases resist penetration from foot traffic or hand pressure.
Test drainage by applying water to various locations throughout the installation area. Water should infiltrate quickly without pooling or running off excessively.
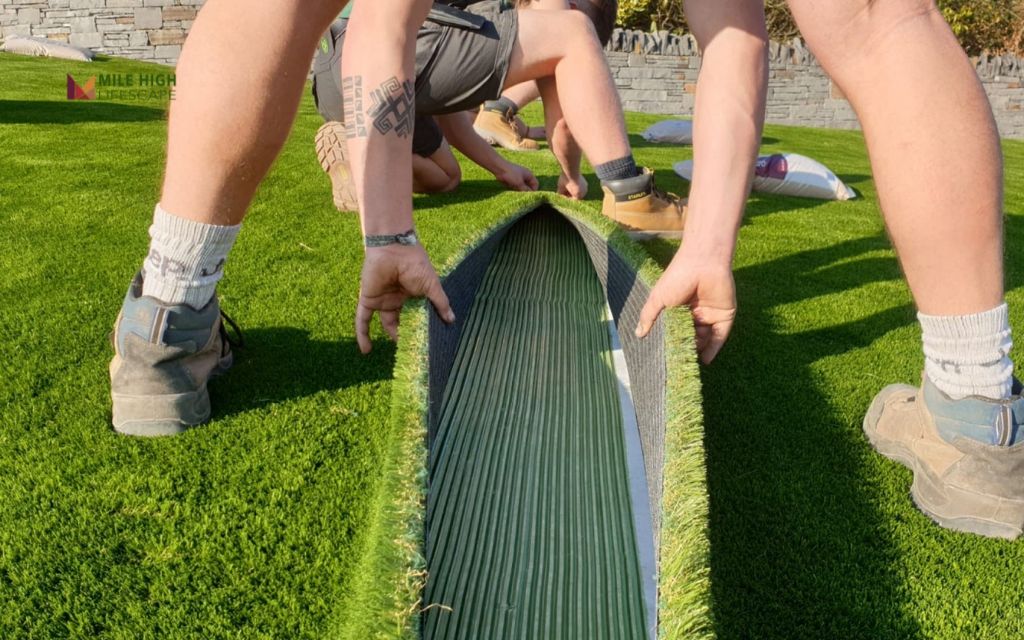
Step 6: Turf positioning and initial cutting
Unroll artificial grass carefully, ensuring all pieces have pile direction running the same way. Consistent pile direction creates uniform appearance and prevents visible seams.
Allow turf to acclimate to ambient temperature before making final cuts. Trim edges using sharp utility knives, making multiple shallow passes for clean, precise cuts.
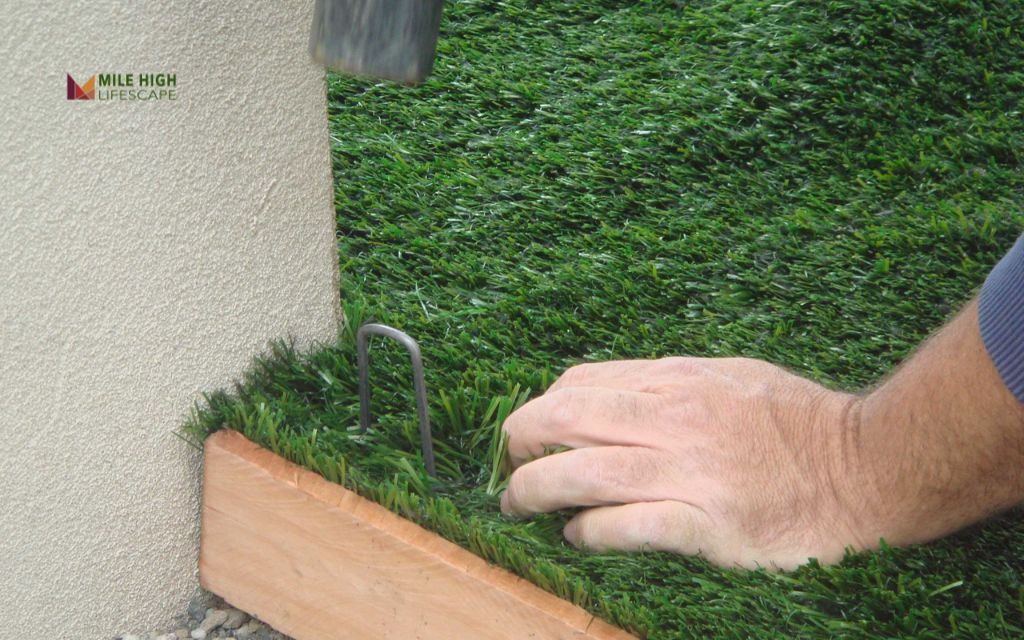
Step 7: Securing and seaming operations
Fasten turf edges using staples or nails every 6-8 inches along perimeters and seams. Avoid over-driving fasteners that could create visible depressions in finished surfaces.
Join multiple turf pieces using manufacturer-approved seaming materials. Apply adhesive evenly and press seams firmly for invisible, durable joints that withstand heavy use.
Step 8: Infill application
Apply infill materials using drop spreaders or broadcast methods for even distribution. Work in multiple light applications rather than single heavy applications to achieve consistent coverage.
Target infill rates based on manufacturer recommendations, typically 1-3 pounds per square foot depending on turf specifications and intended use patterns.
Step 9: Fiber brushing and infill integration
Brush grass fibers upright using stiff brooms or power brushes, working infill material down between individual blades. Brush against pile direction to lift flattened fibers.
Apply light compaction using lawn rollers or foot traffic to settle infill and integrate materials with turf fibers. Avoid excessive compaction that could damage backing materials.
Step 10: Edge installation
Install perimeter edging using materials that complement surrounding landscape features. Secure edging firmly to prevent shifting while maintaining clean, defined borders.
Complete final trimming of excess materials and conduct thorough cleanup of the work area. Inspect the installation for any areas requiring adjustment or additional securing.
Artificial grass maintenance requirements
Proper maintenance preserves appearance and extends lifespan significantly beyond manufacturer expectations.
- Regular cleaning procedures: Remove debris weekly using leaf blowers or rakes designed for synthetic turf. Avoid metal tools that could damage fibers or create permanent marks.
- Fiber maintenance: Brush high-traffic areas monthly to restore upright fiber position and redistribute infill materials. Cross-directional brushing provides best results for maintaining natural appearance.
- Stain management: Address spills immediately using mild detergent solutions and soft brushes. Most common stains respond well to soap and water when treated promptly.
- Drainage maintenance: Keep drainage outlets clear of debris to maintain proper water flow. Rinse turf surfaces periodically to remove accumulated dust and pollen.
- Professional inspections: Schedule annual inspections to identify potential issues before they become major problems. Professional maintenance extends turf life and maintains warranty coverage.
Investment considerations for artificial grass installation
Understanding installation costs helps homeowners make informed decisions about DIY versus professional installation approaches.
- DIY installation costs: Self-installation typically ranges from $5-12 per square foot, including materials and tool rental expenses. Higher-quality materials command premium prices but deliver superior performance and longevity.
- Professional installation investment: Professional services range from $10-18 per square foot, including materials, labor, and warranty coverage. This investment includes expertise, proper equipment, and guaranteed results.
- Long-term value analysis: Calculate total ownership costs including maintenance savings over 15-20 year periods. Artificial grass eliminates water bills, fertilizer costs, and equipment purchases associated with natural grass.
- Financing options: Many contractors offer financing programs that spread installation costs over multiple years. Compare financing terms with potential utility savings to determine overall financial impact.
Conclusion
Installing artificial grass creates beautiful, sustainable landscapes that provide decades of enjoyment with minimal maintenance requirements. This comprehensive guide equips homeowners with knowledge needed for successful DIY projects or informed discussions with professional installers.
Success depends on proper planning, quality materials, and attention to detail throughout each installation phase. Whether you choose DIY installation or professional services, understanding the complete process ensures optimal results.
For nearly two decades, Mile High Lifescape has transformed Denver Metro area properties with expert landscaping solutions. Our experienced team provides comprehensive artificial grass installation services that exceed expectations while delivering guaranteed timeline completion.
Contact Mile High Lifescape today for professional artificial grass installation that combines best practices with competitive pricing. We guarantee quality results that enhance your property value while reducing long-term maintenance requirements.
Frequently asked questions (FAQs)
How long does quality artificial grass last with proper installation?
Premium artificial turf installations typically last 15-25 years with appropriate maintenance. Professional installation and quality materials often exceed manufacturer warranties significantly.
Can I install artificial grass over existing concrete surfaces?
Yes, artificial grass works over concrete with proper preparation including drainage solutions and cushioning underlayment. Concrete installations require specialized techniques for optimal results.
What prevents odors from developing in artificial grass installations?
Proper drainage, antimicrobial infill materials, and regular cleaning prevent odor issues. Pet owners should rinse affected areas regularly and consider specialized infill products designed for animal use.
How does professional installation compare to DIY approaches?
Professional installation provides expertise, proper equipment, and warranty protection that protects your investment. DIY projects save labor costs but require significant time investment and tool purchases.
What distinguishes premium artificial grass from budget alternatives?
High-quality synthetic turf features realistic appearance, durable backing systems, UV resistance, and comprehensive warranties. Premium products use advanced fiber technology and superior manufacturing processes for long-term performance.

