How to clean landscape rocks? To clean landscape rocks, start by removing loose debris like leaves and dirt with a broom or blower. Then, use a garden hose or pressure washer to rinse away dirt and grime.
Landscape rocks accumulate dirt, debris, and stains over time, diminishing your yard’s appeal and potentially harboring pests. Dust particles settle deep into rock crevices, while spring pollen and organic matter accumulate throughout growing seasons.
That’s why understanding how to clean landscape rocks properly is important to restore their natural beauty while extending their lifespan. This comprehensive guide provides Denver homeowners with proven techniques to maintain pristine rock features year-round.
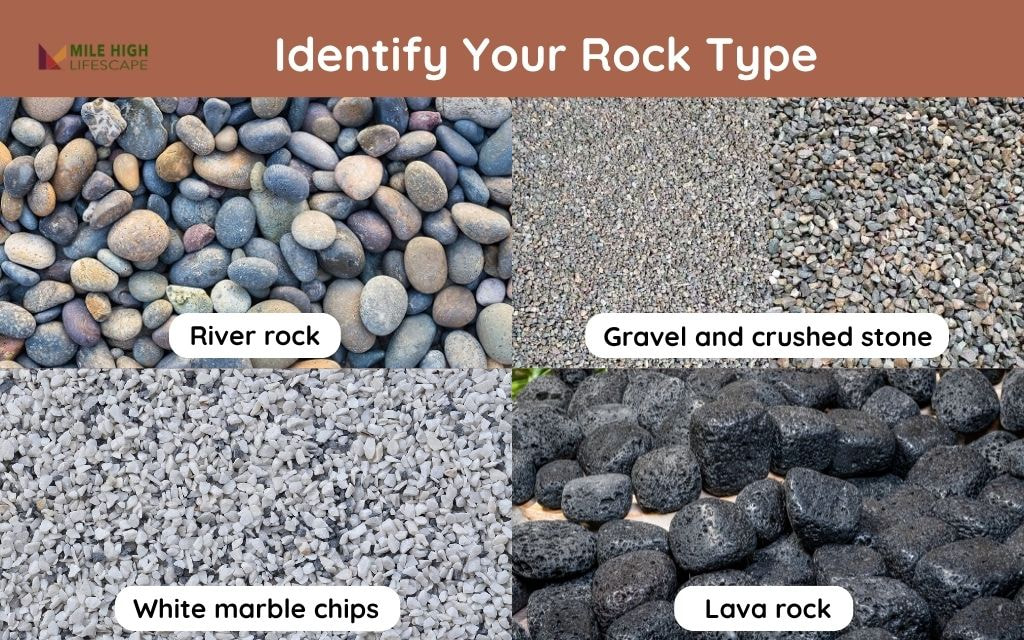
Identify Your Rock Type Before You Clean
Different rock types require specific cleaning methods to avoid damage and achieve optimal results. There are 4 common types of rock:
- River rock features smooth surfaces that rinse easily but develop algae buildup in shaded, moist areas. These rocks respond well to pressure washing and gentle scrubbing with mild detergents.
- Gravel and crushed stone create compact surfaces that trap debris between particles. These materials benefit from blowing and raking rather than heavy water applications that can displace smaller fragments.
- White marble chips stain from organic matter and require gentle cleaning methods to prevent discoloration. Harsh chemicals can permanently damage these decorative stones.
- Lava rock contains porous surfaces that trap dirt and organic material deep within the stone structure. This rock type needs brushing and thorough rinsing to remove embedded particles.
What You’ll Need: Rock Cleaning Tools & Supplies
Gathering proper equipment before starting ensures efficient cleaning and prevents damage to surrounding plants and hardscaping features.
Essential tools include:
- A garden hose with adjustable spray nozzle or low-pressure washer for rinsing operations
- A leaf blower or rake removes surface debris without disturbing rock placement.
- A stiff-bristled broom or scrub brush for manual cleaning of stubborn stains and embedded dirt.
- A wheelbarrow for transporting rocks during deep cleaning procedures.
- Protective gear such as gloves and safety goggles prevents injury from flying debris and chemical splash.
Cleaning solutions include: Mild dish soap or white vinegar mixed with water.
Environmental considerations require avoiding bleach or harsh degreasers that can contaminate soil and harm xeric plants. Denver’s water restrictions may limit cleaning times to early morning or evening hours when evaporation rates decrease.
How to Clean Landscape Rocks in Place: Step-by-Step Process
Cleaning rocks without removal works best for established beds, borders, and large installations where disruption would damage surrounding plants or hardscaping.
Step 1: Remove Surface Debris
Begin by clearing all visible leaves, twigs, and organic matter using a leaf blower or rake. Pull any weeds or seedlings growing between rocks by hand, ensuring complete root removal. Work systematically across the entire area to prevent debris from migrating to cleaned sections.
Timing this step during dry conditions makes debris removal more efficient and prevents muddy conditions. Denver’s frequent afternoon winds can redistribute debris, so complete this phase during calm morning hours.
Step 2: Initial Water Rinse
Apply water using a garden hose with trigger nozzle or pressure washer on low setting. Work in manageable sections to control runoff and prevent erosion of surrounding soil. Direct water flows away from building foundations and toward designated drainage areas.
Denver’s water conservation requirements suggest using minimal pressure settings and avoiding waste through controlled application. Morning or early evening watering reduces evaporation and allows thorough penetration into rock crevices.
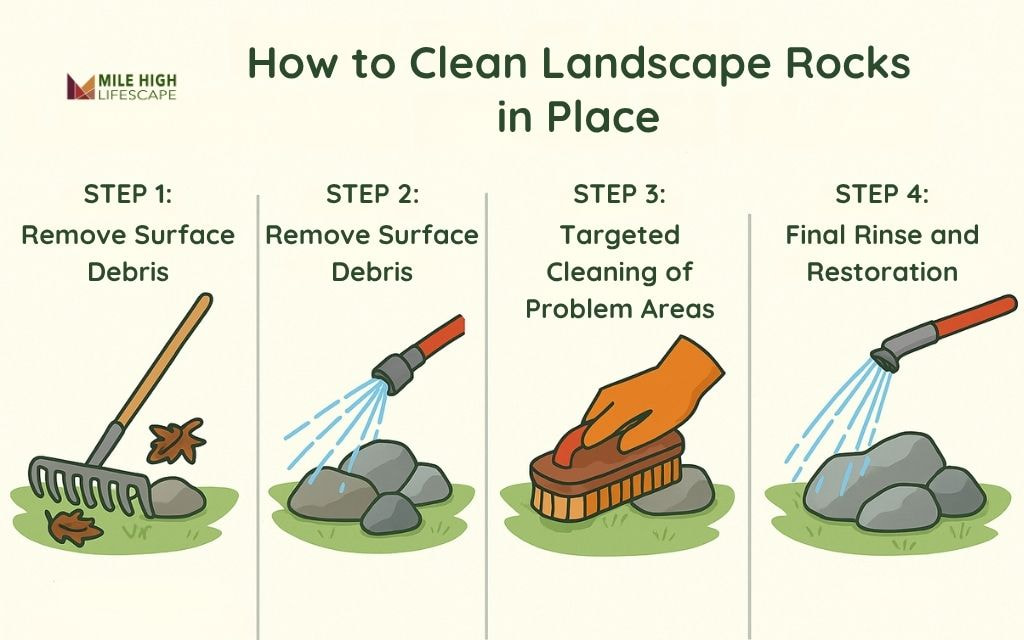
Step 3: Targeted Cleaning of Problem Areas
Mix mild soap or white vinegar with warm water in a 1:4 ratio for an effective cleaning solution.
Apply this mixture to areas showing algae growth, pet stains, or persistent discoloration using a stiff brush or scrub pad.
Scrub in circular motions to dislodge embedded material without displacing rocks from their intended positions. Focus attention on high-traffic areas and locations with visible staining or organic buildup.
Rinse immediately after scrubbing to prevent soap residue accumulation that can attract additional dirt and debris. Avoid soaking areas near sensitive plant root zones to prevent oversaturation and potential root rot.
Step 4: Final Rinse and Restoration
Conduct a thorough final rinse to remove all cleaning solutions and loosened debris. Allow rocks to air dry completely before making any adjustments to placement or adding fresh material.
Rake rocks back to even levels and restore proper coverage over weed barrier fabric. Inspect for areas requiring additional rock material to maintain consistent depth and appearance.
Consider applying a thin layer of fresh rock material if existing coverage appears thin or weathered. This top-dressing restores visual appeal and provides continued weed suppression.
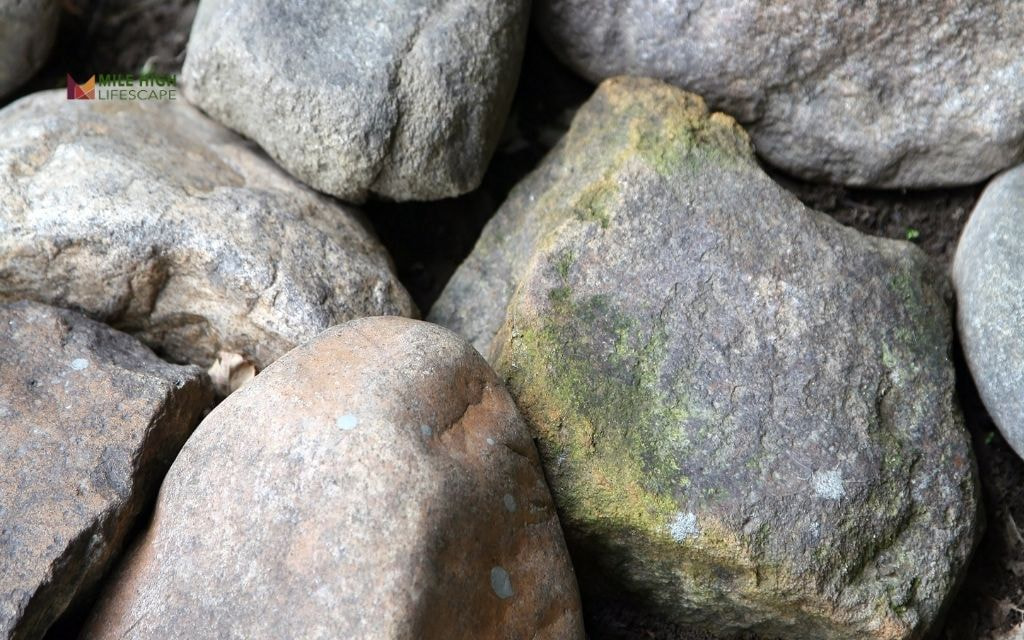
How to Clean Large Landscaping Rocks
Large decorative rocks and accent boulders require specialized cleaning approaches due to their size and permanent placement within landscape designs.
Step 1: Prepare the Cleaning Area
Cover surrounding vegetation with plastic sheeting or tarps to protect plants from cleaning solutions and high-pressure water. Position yourself safely around the boulder to access all surfaces without straining or losing balance.
Step 2: Apply Initial Water Pressure
Use a pressure washer on medium setting or garden hose with jet nozzle to remove loose dirt and debris. Maintain consistent distance from the rock surface to ensure even cleaning without creating damage or etching patterns.
Step 3: Scrub Textured Surfaces
Mix mild vinegar with water in a 1:3 ratio and apply using a long-handled brush for textured boulder surfaces. Work from top to bottom in systematic sections to prevent dirty water from re-contaminating cleaned areas.
Step 4: Target Problem Areas
Focus additional scrubbing attention on moss, mildew, or algae growth typically found in shaded crevices and north-facing surfaces. Use stiff brushes to dislodge biological growth without damaging natural rock texture.
Step 5: Final Rinse and Inspection
Conduct thorough rinsing to remove all cleaning residue and prevent white vinegar deposits that can alter natural rock coloration. Inspect all surfaces for remaining contamination and repeat cleaning as needed before allowing air to dry.
How to Clean Rocks in Landscape Beds or Pathways
Rocks integrated within planted areas or forming pathways require careful cleaning methods that minimize disruption to surrounding features.
Step 1: Assess Plant Proximity
Identify sensitive plants near rock areas and plan a cleaning approach to avoid root zone flooding or chemical contact. Mark areas requiring extra caution during water application phases.
Step 2: Remove Debris Without Disturbance
Use leaf blowers on low settings or hand rakes to remove surface debris without disturbing rock placement or nearby plant roots. Work methodically to prevent debris migration to cleaned sections.
Step 3: Apply Targeted Water Cleaning
Rinse rocks using a garden hose with a trigger nozzle for precise water control. Focus on individual rock surfaces rather than flooding entire areas to prevent soil erosion and plant damage.
Step 4: Spot-Treat Visible Stains
Apply diluted cleaning solutions using spray bottles for precise application on stained areas. This targeted approach minimizes chemical exposure to surrounding plants while effectively addressing problem spots.
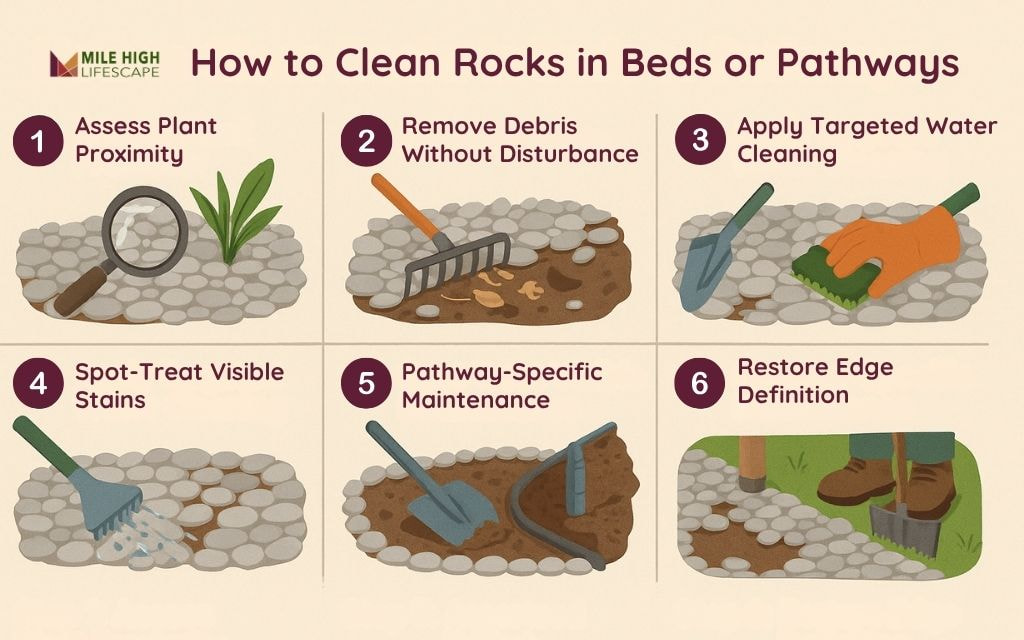
Step 5: Pathway-Specific Maintenance
For walkway rocks, sweep regularly to prevent grinding action that embeds particles deeper into surfaces. Top-dress annually with fresh material and refresh polymeric sand between joints to maintain pathway integrity.
Step 6: Restore Edge
Use edging tools to re-establish clean borders between rock pathways and adjacent planted beds or paved surfaces. This prevents rock migration and maintains design integrity.
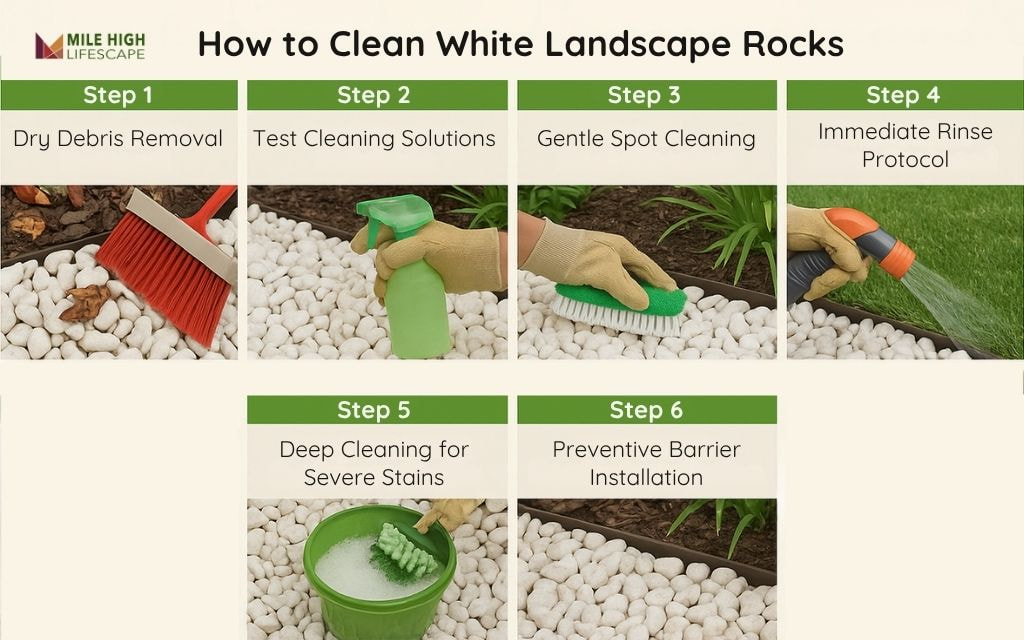
How to Clean White Landscape Rocks
White decorative rocks (Marble, Quartz Chips) present unique cleaning challenges due to their tendency to show stains and discoloration more readily than darker materials.
Step 1: Dry Debris Removal
Remove all surface dirt using leaf blowers before applying any water to prevent mud formation that can permanently stain light-colored surfaces. Work during dry conditions for optimal debris lifting.
Step 2: Test Cleaning Solutions
Test cleaning solutions on inconspicuous rock samples first to ensure no adverse reactions occur with specific stone types. Use 1:1 water and white vinegar mixture as a standard cleaning solution.
Step 3: Gentle Spot Cleaning
Apply cleaning solution to stained areas using soft brushes and gentle circular motions. Avoid aggressive scrubbing that can create surface scratches visible on light-colored materials.
Step 4: Immediate Rinse Protocol
Rinse cleaned areas immediately after scrubbing to prevent cleaning solution residue that can attract additional dirt or cause discoloration. Use clean water and thorough coverage.
Step 5: Deep Cleaning for Severe Stains
For heavily stained rocks, remove affected stones and clean on mesh screens or tarps away from landscape areas. This intensive approach allows thorough cleaning without contaminating surrounding features.
Step 6: Preventive Barrier Installation
Install light-colored weed barriers beneath white rocks to prevent dark soil from showing through thin coverage areas. This preventive measure maintains consistent appearance and reduces future cleaning requirements.
Tips for Keeping Your Landscape Rock Clean Long-Term
Preventive maintenance reduces cleaning effort and extends rock life through proactive care strategies tailored to Denver’s climate conditions:
- Apply pre-emergent weed treatments twice annually during early spring and late fall. These applications create barriers that reduce organic matter accumulation and simplify maintenance routines.
- Monthly debris removal using rakes or leaf blowers prevents organic matter decomposition that creates staining and provides nutrients for unwanted plant growth.
- Top-dress thin or sunken areas every one to two years with fresh rock material. This maintenance preserves consistent coverage depth, restores visual appeal and maintains effective weed suppression.
- Install drip irrigation systems to minimize splash and mud buildup around rock features.
- Add decorative boulders or anchor plants to reduce wind-blown debris accumulation in exposed areas.
Conclusion
Clean landscape rocks transform outdoor spaces into attractive, functional environments that require minimal ongoing maintenance. Regular attention using proper techniques ensures rock features remain beautiful and effective for years while supporting healthy plant growth and soil conditions.
Simple tools and seasonal maintenance routines keep rock landscapes looking their best without expensive replacement or renovation projects. Denver homeowners can achieve professional results through consistent care and appropriate cleaning methods.
For complex cleaning challenges, extensive renovations, or new rock installations, Mile High Lifescape provides landscape rocks Denver services throughout the Denver Metro area. Our experienced team understands local conditions and delivers lasting solutions for all landscape needs.
Contact us at (303) 877-9091 or hello@milehighlifescape.com today!
Frequently Asked Questions (FAQs)
How do you clean dirt and leaves out of landscape rocks?
Use a leaf blower or rake to remove surface debris first, then rinse with a garden hose using controlled pressure to avoid displacing rocks. Work systematically across the area during dry conditions for best results.
How to make landscape rocks look wet permanently?
Apply rock sealers or stone enhancers designed for outdoor use. These products create glossy finishes that simulate wet appearance while providing protection against staining and weathering.
How do you refresh landscaping rocks?
Remove debris, clean thoroughly with appropriate methods for your rock type, then add fresh material to restore proper depth and coverage. Consider applying stone enhancers for renewed color and protection.
How often should I clean my rock landscape in Denver?
Clean rock landscapes twice per year – once in spring after winter debris accumulation and again in fall before winter weather. Monthly debris removal and spot cleaning maintain appearance between major cleanings.
Will vinegar harm my surrounding plants or soil?
No, when properly diluted and applied sparingly. White vinegar in 1:4 water ratios breaks down organic matter without harming plants. Rinse thoroughly after cleaning to prevent soil pH changes from concentrated applications.

