How to install landscape rock in Denver yards? The answer lies in knowing why rock landscaping matches our region’s demanding conditions.
These rocks thrive where traditional lawns struggle, offering water conservation that reduces utility costs while maintaining visual appeal year-round. Besides, the benefits extend beyond durability.
Rock installations eliminate weekly mowing, seasonal fertilizing, and constant watering that grass demands. They resist wind erosion common at our altitude while providing structural elements that enhance property value.
This guide provides step-by-step instruction for successful rock installation using professional techniques. You’ll discover material selection strategies, soil preparation methods, and installation processes specifically designed for Denver climate.
Tools and Materials You’ll Need for Installation
Successful rock installation requires the right equipment and materials. Gather these items before starting your project:
Essential Materials:
- Landscape rock (river rock, decomposed granite, crushed stone, or lava rock)
- Commercial-grade landscape fabric with UV resistance
- Steel or concrete edging material
- Landscape staples and utility knife
- Sand or gravel for base preparation
Required Tools:
- Shovel and bow rake for spreading
- Hand tamper or plate compactor rental
- Wheelbarrow or landscape cart
- Measuring tape and marking spray
- Garden hose for cleanup
Purchase 10% more rock than your calculated needs. This accounts for settling and allows for border adjustments. Calculate your rock needs by multiplying length times width times depth in feet, then divide by 27 for cubic yards.
Most installations use 2-3 inches of depth for decorative gravel and 3-4 inches for river rock applications.
How to Install Landscape Rock: Step-by-Step Guide
Step 1: Plan and Measure Your Rock Area
Start by sketching your installation area and calculating square footage. Measure length and width carefully, noting any irregular shapes or slopes. Use marking spray to outline borders clearly.
Choose appropriate depth based on rock type and traffic patterns. Walkway areas need 2 inches maximum to prevent shifting. Decorative beds can handle 3-4 inches for better weed suppression.
Pro tip: Use online calculators to convert square footage into cubic yards needed. Most suppliers sell by the cubic yard or ton.
Step 2: Clear the Area and Remove Weeds
Remove all existing vegetation, including grass, weeds, and root systems. Use a sharp spade to cut clean edges. For large areas, rent a sod cutter to save time and reduce back strain.
Spray persistent weeds like bindweed with herbicide two weeks before installation. This prevents regrowth through your new rock bed.
Pro tip: Schedule clearing work for early spring or fall when soil moisture makes removal easier. Summer installations require pre-watering to soften compacted clay.
Step 3: Grade the Soil and Ensure Drainage
Create proper drainage by sloping away from structures at minimum 2% grade. This prevents water accumulation against foundations during snowmelt season.
Remove rocks, debris, and organic matter from the soil surface. Compact loose areas with a hand tamper. Add sand to low spots and rake smooth.
Pro tip: Rent a plate compactor for areas larger than 200 square feet. Proper compaction prevents settling and maintains rock depth consistency.
Step 4: Install Edging to Contain Rock
Install edging material along all borders to prevent rock migration. Steel edging provides the most durability, while concrete offers permanent definition. Plastic bender board works for curved areas.
Dig a narrow trench for edging placement. Position the top edge level with your planned rock surface. Secure with stakes every 2-3 feet.
Pro tip: Choose edging height that matches your rock depth. Visible edging creates clean lines and easier maintenance.
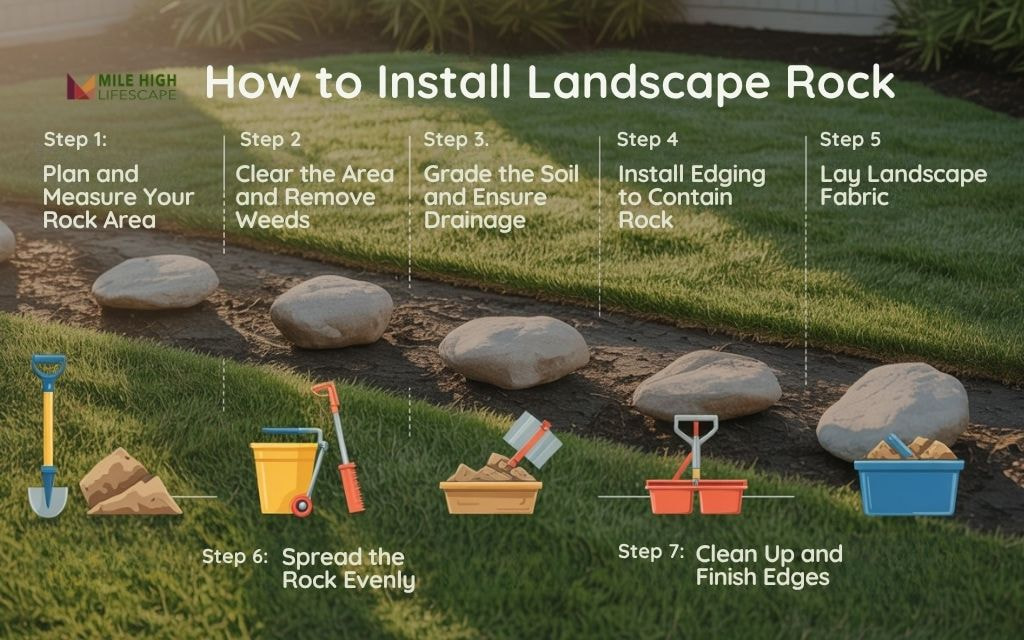
Step 5: Lay Landscape Fabric
Install commercial-grade landscape fabric over the prepared soil. Cut fabric to fit your area, allowing 6-8 inches of overlap at seams. Avoid plastic sheeting, which blocks drainage and creates plant problems.
Secure fabric with landscape staples every 3 feet along edges and seams. Cut X-shaped openings only where plants will be installed.
Pro tip: Use fabric rated for commercial applications. Residential-grade materials degrade quickly under Denver’s intense UV exposure.
Step 6: Spread the Rock Evenly
Pour rock in manageable piles across the fabric surface. Use a bow rake to spread material evenly, working from one end to the other. Maintain consistent depth throughout.
Avoid walking on fabric during installation. Work from outside the bed or use temporary boards to distribute weight.
Pro tip: Rinse dusty rock materials before installation near patios or walkways. This prevents tracking and staining.
Step 7: Clean Up and Finish Edges
Remove installation debris and excess material. Rake edges smooth and check depth consistency. Rinse nearby hardscapes to remove rock dust.
Add accent boulders or drought-tolerant plants to complete your design. Water any planted areas thoroughly to establish roots.
Pro tip: Walk the perimeter and adjust rock levels for consistent appearance. Small adjustments make significant visual improvements.
DIY vs. Hiring a Professional in Denver: What to Consider
Consider these factors when deciding between DIY installation and professional services:
- Cost Comparison: DIY projects cost $2-4 per square foot for materials only. Professional installation ranges $8-12 per square foot but includes labor, tools, and expertise.
- Time Investment: DIY installations require 1-3 days per 500 square feet, depending on soil conditions and complexity. Professionals complete similar areas in 1-2 days total.
- Skill Requirements: DIY projects demand physical labor, planning skills, and tool operation knowledge. Professional services provide turnkey solutions with guaranteed results.
- Quality Considerations: DIY work quality varies with experience level. Professional installations include warranties and use proven techniques for long-term success.
- Denver-Specific Factors: Local professionals understand clay soil challenges, drainage requirements, and material selection for Colorado conditions. They also handle permit requirements and HOA compliance.
For slopes steeper than 15%, complex drainage issues, or areas exceeding 1,000 square feet, professional installation often provides better value through expertise and efficiency.
Mile High Lifescape offers custom landscape rock installation with Denver soil expertise and drainage solutions tailored to Front Range conditions.
Common Mistakes to Avoid When Installing Landscape Rock
Avoid these installation errors that compromise long-term success:
- Inadequate Weed Removal: Skipping thorough vegetation removal allows weeds to penetrate rock surfaces. Bindweed and other persistent species will find gaps and create maintenance problems.
- Poor Fabric Installation: Improper overlap or inadequate securing leads to fabric movement and weed breakthrough. Use commercial-grade materials and follow manufacturer specifications.
- Excessive Rock Depth: Installing rock deeper than 4 inches creates walking difficulties and wastes material. Most applications function best with 2-3 inches of coverage.
- Drainage Neglect: Failing to plan for water movement causes pooling, erosion, and ice damage. Denver’s snowmelt patterns require careful grade consideration.
- Wrong Rock Selection: Choosing inappropriate materials for traffic areas creates safety hazards. Small gravel shifts underfoot, while large river rock provides stable walking surfaces.
- Edge Containment Issues: Skipping edging installation or using inadequate materials allows rock migration and reduces visual appeal. Proper containment maintains clean lines and prevents maintenance problems.
Conclusion
Landscape rock installation provides Denver homeowners with water-efficient, low-maintenance outdoor solutions that enhance property value and reduce long-term care requirements. Proper installation techniques ensure decades of performance with minimal upkeep needs.
Success depends on thorough preparation, quality materials, and attention to drainage details specific to Colorado’s climate conditions. Whether you choose DIY installation or professional services, following proven methods creates lasting results.
Start with smaller areas to gain experience, or partner with Mile High Lifescape to transform your entire yard efficiently. If you need landscape rocks near me in Denver, our team understands local soil conditions and climate challenges, delivering custom solutions that exceed expectations.
Frequently Asked Questions (FAQs)
What do you put down before rocks for landscaping?
Before placing rocks for landscaping, install landscape fabric or similar barrier material over prepared soil. This prevents weed growth and soil displacement while allowing proper drainage.
What’s the best time of year to install landscaping rock in Denver?
The best time to install landscaping rock in Denver is during spring or fall when weather conditions remain favorable for outdoor work. Spring installation allows summer establishment before winter, while fall timing takes advantage of cooler temperatures and reduced UV exposure. Avoid summer installation during peak heat periods and winter when ground freezing complicates soil preparation.
Can I mix mulch and rock in the same yard?
Yes, you can mix mulch and rocks in the same yard to create visually appealing and practical landscaping solutions. Use organic mulch around plants requiring moisture retention and nutrients, while placing rock in high-traffic areas and slopes where durability matters most.
How to make landscape rocks stay in place?
Keep landscape rocks in place using several proven techniques:
- Install quality landscape fabric as a foundation layer.
- Add steel or concrete edging along borders to prevent migration.
- Choose appropriate rock sizes for the application – larger materials shift less than small gravel.
- Create proper drainage to prevent water movement that displaces materials. Compact the base thoroughly before rock installation.
How deep to lay landscape rock?
For most decorative landscape rock applications, maintain a depth of 2-3 inches for optimal results. Walkway areas need 2 inches maximum to prevent shifting and tripping hazards. Decorative beds can handle 3-4 inches for better weed suppression.
