Using xeriscape rocks allows you to replace water-intensive turf with a durable, attractive, low-maintenance landscape designed for Denver. As water restrictions tighten and utility bills climb, more Denver homeowners are discovering that rock-based xeriscaping offers a practical solution to Colorado’s unique landscaping challenges.
What this guide will cover:
- Best rock types for Denver conditions
- How to design and install rock-based xeriscapes
- Cost ranges
Whether you’re converting your entire front yard or starting with a small section, understanding how to select and install xeriscape rocks correctly will save you money, prevent frustration, and create a landscape that thrives in Colorado.
Types of xeriscape rocks
Common xeriscape rock types
Not all rocks suit xeriscaping. Some migrate. Others trap heat. The best options balance aesthetics, stability, and plant compatibility.
- River rock: These stones range from 1-6 inches and provide a natural, organic appearance that complements native plantings. River rock works well around water features or dry creek beds but can shift on slopes.
- Pea gravel: Pea gravel consists of small, pea-sized stones (¼-⅜ inch) ideal for pathways and tight spaces around plant bases. While attractive, pea gravel migrates easily under foot traffic and should be confined to bordered areas. It’s one of the most affordable options but requires more frequent replenishment than larger rocks.
- Crushed granite and crushed stone: This type of rock features angular edges that lock together, creating stable surfaces resistant to erosion. These rocks excel on slopes and high-traffic areas. Decomposed granite (DG) compacts into firm walking surfaces, while ¾-inch crushed stone provides excellent drainage. The angular texture prevents shifting better than rounded river rock.
- Decorative gravel (lava rock, slate chips, and colored glass): Lava rock is lightweight and available in red or black, perfect for modern designs but prone to fading. Slate chips offer rich colors and flat profiles that create contemporary aesthetics.
- Boulders and cobble: These rocks (8 inches and larger) serve as structural anchors and focal points. Moss rock boulders add vertical interest and naturalistic texture. Fieldstone cobbles create borders and define planting zones.

Rock size
Rock diameter significantly impacts both performance and appearance:
- Small rocks (¼-1 inch) like pea gravel and fine decorative stone offer detailed texture and work beautifully in confined spaces. However, they migrate easily, get displaced by wind and rain, scatter onto sidewalks, and require metal or plastic edging to stay contained. Small rocks also expose more surface area, allowing weed seeds to settle between particles.
- Medium rocks (1-3 inches) provide the most versatility for Denver xeriscapes. They’re heavy enough to resist wind displacement, light enough for DIY installation, create adequate depth with reasonable coverage, and allow better airflow around plant crowns to prevent rot.
- Large rocks (3-6+ inches) deliver maximum stability on slopes and erosion-prone areas. They require less depth for coverage (reducing material costs), create bold visual statements, and need minimal maintenance.
Color, heat, and plant health
Rock color directly affects soil temperature and plant performance in sunlight. This consideration becomes critical on south and west-facing exposures.
- Light-colored rocks (tan, beige, grey, white) reflect sunlight rather than absorbing it, keeping soil temperatures cooler than dark alternatives during summer. Light rock proves essential around heat-sensitive plants, in areas with afternoon sun exposure, and in yards with minimal shade.
- Dark-colored rocks (black, charcoal, deep red) absorb and retain heat, which can stress plants during June through August. However, darker rocks serve specific purposes: they accelerate snowmelt in spring, warm soil for heat-loving plants in cooler microclimates, and create dramatic visual contrast in shaded areas under trees or north-facing beds.
Many successful Denver xeriscapes use color strategically – lighter rocks in full sun zones paired with darker accents in shaded areas or as bordered pathways where heat reflection benefits winter walkability.
Designing with xeriscape rocks (what looks good vs what fails)
Rock-only yards vs balanced designs
The most common mistake in Denver xeriscaping is installing rock without sufficient plant material. While eliminating all vegetation maximizes water savings, it creates several problems:
- Unbroken rock surfaces absorb and radiate intense heat, making yards uncomfortable from June through August and potentially violating HOA guidelines
- Without plants to provide vertical interest, seasonal color, and textural contrast, rock-only yards appear barren or unfinished
- Plants and mulched soil absorb rainfall that rock surfaces shed, potentially creating drainage issues
- Studies show well-designed xeriscapes with 30-50% plant coverage maintain higher resale appeal than stark, vegetation-free yards
How plants soften and cool rock landscapes:
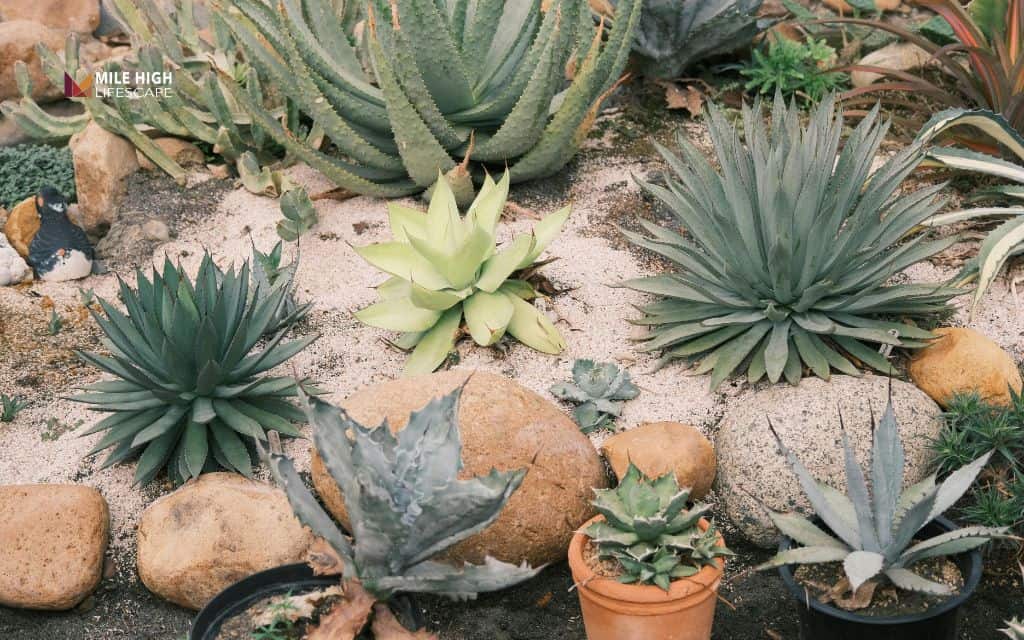
Integrating drought-tolerant plants breaks up thermal mass and adds living texture. Native grasses like blue grama, shrubs such as rabbitbrush and Apache plume, and perennials including penstemon and blanket flower thrive in rock mulch.
Plants transpire moisture that cools surrounding air, provide wildlife habitat that rock alone cannot support, and create seasonal interest through flowers, foliage color, and winter structure.
The ideal Denver xeriscape balances 40-60% rock coverage with 30-40% plant material and 10-20% decorative elements like boulders, pathways, or dry creek beds.
Layering rocks for visual depth
Professional xeriscape designs use multiple rock sizes and textures to create dimension:
- Fine gravel base: A ½-¾ inch crushed stone layer at the soil surface provides excellent drainage, suppresses weeds, and creates a neutral foundation. This base layer remains mostly hidden.
- Medium rock field: The primary visual layer uses 1-2 inch rock spread 2-3 inches deep across planted areas. This layer defines the landscape character – choose river rock for natural aesthetics or crushed granite for contemporary designs.
- Accent boulders: Strategic placement of 12-24 inch feature stones creates focal points and anchors plant groupings. Position boulders partially buried (⅓ underground) to appear natural rather than placed, and cluster in odd-numbered groups (3, 5, 7) following nature’s asymmetry.
This three-layer approach delivers professional depth while maintaining practical function. The varied textures catch light differently throughout the day, creating visual interest that monolithic rock installations lack.
Front yard vs backyard design differences
Different spaces serve different purposes and deserve tailored approaches:
Front yards prioritize curb appeal:
- Choose cohesive color palettes that complement home exterior
- Include at least 40% plant coverage for visual warmth
- Create clear pathways to entry using contrasting rock or pavers
- Edge lawn-to-rock transitions crisply with metal or stone borders
- Consider HOA guidelines regarding rock type and coverage percentages
Backyards emphasize privacy and usability:
- Allow more experimental designs with bold color or texture contrasts
- Dedicate more space to pure rock if creating patio areas or dog runs
- Incorporate larger gathering stones or boulders for seating
- Design drainage more aggressively since backyards often slope toward homes
- Balance high-traffic zones (patios, play areas) with planted sanctuary spaces
How to install xeriscape rocks correctly
Step 1: Plan layout, drainage, and plant zones
Before purchasing a single pound of rock, map your project on paper or digitally:
Identify slopes and water paths
Walk your yard during a rainstorm or run sprinklers to observe water flow. Mark areas where water pools or rushes, as these zones require different rock depths or drainage solutions like French drains. Denver’s clay soil channels water rather than absorbing it, making drainage planning critical.
Decide where plants will live before adding rock
Determine planting zones based on sun exposure, water access, and mature plant size. Mark these areas – you’ll remove less turf and preserve existing soil structure where plants will grow. Calculate rock coverage separately from planting beds to avoid over-purchasing materials.
Step 2: Remove turf and prep the base
Sod removal options
Manual removal using a sod cutter provides the most control and works well for small to medium areas under 1,000 square feet. Cut sod into 12×18-inch sections, roll, and remove.
Herbicide treatment with glyphosate kills grass in 7-14 days but requires waiting periods before planting and may necessitate repeat applications for tough weeds. This method works for large areas but delays project timelines.
Solarization using clear plastic sheeting kills grass and weeds in 6-8 weeks through heat accumulation. This chemical-free method works best May through July in Denver’s peak sun.
Grading for drainage
Ensure final soil grade slopes 2-3% away from your home foundation – approximately ¼ inch per foot. Use a long level and measuring tape to verify pitch. In areas where water will accumulate (low corners, against fences), excavate 6-8 inches deep and fill with ¾-inch drain rock before installing landscape fabric and decorative rock.
Compaction where needed
High-traffic areas like pathways or parking strips benefit from compaction. Rent a plate compactor and make 2-3 passes over exposed soil. Skip this step in planting zones, where loosened soil benefits root development.
Step 3: Landscape fabric
Heavy-duty woven fabric only
Professional-grade woven polypropylene landscape fabric (4-5 oz weight) allows water and air penetration while blocking light from weed seeds. This fabric lasts 10-15 years under rock.
Why cheap plastic fails
Lightweight plastic sheeting (contractor plastic, black plastic) tears easily, prevents water infiltration causing runoff and plant death, breaks down in UV light within 2-3 years, and creates a slippery surface under rock during installation.
Never use plastic sheeting as landscape fabric in xeriscapes – it creates more problems than it solves.
When fabric is unnecessary
Skip fabric in established planting beds where you want organic mulch to decompose and enrich soil, under decomposed granite that compacts into firm surfaces, and in natural areas mimicking wild landscapes where occasional weeds add to informal aesthetics.
Step 4: Install rock at the right depth
Spread rock 2-3 inches deep across fabric for effective weed suppression and aesthetic coverage. Depths less than 2 inches expose fabric and allow weed penetration.
Calculate coverage using this formula: one ton of rock covers approximately 100 square feet at 2 inches deep, or 65 square feet at 3 inches deep.
Low spots and drainage swales benefit from 4-6 inches of rock depth, creating French drain functionality. Layer ¾-inch drain rock (crusher fines) at the bottom for water movement, then top with 2-3 inches of decorative rock.
Even distribution tips:
Pour rock in multiple small piles across the area rather than one large heap. Distribute with a rake, working from piles outward to avoid walking on fabric. A landscape rake (available at rental stores) makes leveling large areas much easier than garden rakes.
Check depth with a ruler at multiple points. Inconsistent depth creates visual patchiness and allows weeds through thin spots.
Step 5: Add edging and transitions
Metal edging and stone borders
Steel or aluminum edging (starting at $2-$4 per linear foot) creates crisp, permanent borders between rock and lawn areas. Install edging so the top sits ½ inch above rock level to contain materials.
Natural stone borders using 6-12 inch flagstone or moss rock ($8-$15 per linear foot installed) provide rustic transitions and withstand freeze-thaw cycles better than plastic alternatives.
Preventing rock migration
Rock naturally migrates toward lower areas over time. Combat this by installing edging along all horizontal transitions (sidewalks, driveways, lawn edges), creating slight berms or lips at transition points, and using heavier rock (2+ inches) along problem edges.
Refresh migrated rock annually in spring, raking material back into place. This 15-minute maintenance task prevents long-term depletion and keeps borders sharp.
Cost breakdown – Xeriscape rocks in Denver
Material costs by rock type
Understanding Denver-area pricing helps you budget accurately:
| Rock Type | Price Per Ton | Coverage at 2″ Depth | Best Use |
| Pea Gravel (⅜”) | $35-$55 | 110 sq ft | Pathways, plant bases |
| Crushed Granite (¾”) | $40-$65 | 100 sq ft | General coverage, slopes |
| River Rock (1-3″) | $50-$90 | 90 sq ft | Natural aesthetics |
| Decomposed Granite | $40-$65 | 80 sq ft (compacted) | Patios, firm surfaces |
| Decorative Gravel | $60-$100 | 95 sq ft | Accent areas |
| Lava Rock | $60-$100 | 140 sq ft (lightweight) | Modern designs |
| Moss Rock Boulders | $150-$400 | N/A (accent pieces) | Focal points |
Bagged vs bulk comparison:
Bagged rock from home improvement stores costs $4-$8 per 0.5 cubic foot bag, equivalent to $300-$450 per ton – roughly 5-7 times more expensive than bulk delivery. Bagging makes sense only for projects under 100 square feet or where access prevents bulk delivery.
For typical Denver front yards (800-1,200 sq ft), bulk delivery offers substantial savings. A 1,000 square foot xeriscape requiring 10 tons of rock costs $400-$650 in bulk versus $3,000-$4,500 in bags.
Delivery vs pickup
When delivery saves money:
Bulk suppliers charge $50-$125 for delivery within Denver metro, depending on distance and order size. Orders above 3-5 tons often include free delivery. Factor in your time (multiple trips), vehicle wear (truck rental if needed), and physical effort.
Access considerations in Denver neighborhoods:
Many established Denver neighborhoods have narrow driveways, mature trees, and tight turns that complicate delivery. Suppliers need:
- 10-12 feet of overhead clearance for dump truck beds
- 12-15 feet of width for truck maneuvering
- Firm surfaces (concrete, asphalt) to support 30,000+ lb vehicles
If delivery isn’t feasible, consider curbside drop with wheelbarrow transport or landscape supply yards offering smaller truck options for residential access.
DIY vs professional installation costs
When DIY makes sense:
Projects under 500 square feet with minimal slope, existing good drainage, and willing labor can succeed as DIY ventures. Budget $400-$800 in materials (rock, fabric, edging) plus tool rentals ($150-$300). Total DIY cost: $550-$1,100 for small xeriscapes.
When pros save money long-term:
Professional installation costs $3-$7 per square foot including materials, labor, and equipment. A typical 1,000 square foot Denver front yard runs $3,000-$7,000 installed. This pricing includes:
- Proper drainage grading and soil preparation
- Professional fabric installation with correct overlaps
- Even rock distribution at consistent depths
- Clean edging and transitions
- Warranty on materials and workmanship
Professionals prevent costly mistakes like inadequate drainage causing foundation issues ($2,000-$8,000 to repair), insufficient depth allowing weed takeover (requiring complete reinstallation), improper fabric creating plant death zones, and poor heat management stressing expensive plants.
Conclusion
When planned and installed correctly, xeriscape rocks can dramatically reduce water use by 70-90%, simplify maintenance to minimal seasonal upkeep, and create a clean, modern landscape designed for Denver’s semi-arid climate.
Start with one lawn section rather than overwhelming yourself with a full-yard conversion. Choose rock types based on heat reflection, drainage needs, and aesthetic goals. Design for both function and beauty by balancing rock coverage with drought-tolerant plants that soften hard edges and cool your landscape.
Whether you DIY or hire professional landscape rock service, understanding proper rock selection, installation depth (2-3 inches minimum), and drainage planning prevents costly mistakes. If you want a xeriscape that looks polished and meets Denver Water guidelines, Mile High Lifescape can help you create a water-wise landscape that thrives in Colorado’s challenging conditions.
Call (303) 877-9091 or email hello@milehighlifescape.com to discuss your xeriscape rock project. We offer free quotes and site evaluations throughout the Denver metro area.
Frequently asked questions (FAQs)
What are the best xeriscape rocks for Denver?
Crushed granite and crushed stone work best for stability on slopes, while 1-3 inch river rock provides natural aesthetics. Choose light-colored rocks (buff, tan, grey) for south-facing areas to minimize heat, and avoid dark rocks in full sun exposures.
How deep should xeriscape rocks be?
Install xeriscape rocks 2-3 inches deep for proper weed suppression and fabric coverage. Drainage areas need 4-6 inches, while high-traffic pathways require 3-4 inches. Depths under 2 inches allow weeds to penetrate.
Are xeriscape rocks cheaper than grass?
Xeriscape rocks cost more upfront ($3-$7 per square foot installed versus $0.35-$0.75 for sod), but save $500-$1,000 annually through eliminated water, mowing, and fertilizing costs. Most Denver homeowners recover installation costs within 3-5 years.
Do xeriscape rocks increase heat?
Dark rocks increase heat by 10-20°F, but light-colored rocks reflect heat and stay cooler. Mixing rocks with drought-tolerant plants reduces heat island effects, as plants cool surrounding air by 5-10°F through transpiration.
Can I mix rocks and plants in a xeriscape?
Yes, mixing rocks and plants creates the most successful xeriscapes. Aim for 40-60% rock coverage with 30-40% drought-tolerant plants to provide visual interest, reduce heat, support wildlife, and prevent the barren look of all-rock yards.

