Learning how to lay stone wall properly means understanding foundations, drainage, stone selection, and climate-specific techniques that make the wall last for decades instead of failing after a few winters.
If you’re dealing with a sloped yard that erodes after every rainstorm, or you want to create terraced garden beds that actually stay put, a well-built stone wall solves these problems while adding lasting beauty to your property.
This guide covers everything you need to know:
- Types of stone walls and which work best in Denver gardens
- Tools, materials, and realistic cost expectations
- Step-by-step instructions to lay a stone wall correctly
- Common mistakes that cause wall failure
- When to DIY versus when to hire professionals
Whether you’re building your first garden wall or correcting a failing structure, understanding these fundamentals will save you time, money, and frustration.
Choosing the right type of stone wall for your Denver yard
Dry-stack stone walls
A dry-stack wall relies on gravity and friction instead of mortar. Stones lock together through careful placement and weight distribution. This design offers significant advantages in Denver’s climate.
When soil shifts or frost pushes against the wall, individual stones adjust slightly without cracking. Small movements dissipate forces that would fracture mortared joints.
Repairs remain straightforward: you simply reposition stones rather than chiseling out failed mortar and re-pointing joints.
Mortared stone walls
Mortared walls create permanent bonds between stones using cement-based compounds.
This approach delivers a cleaner, more formal appearance that suits traditional Denver architecture. The mortar locks stones in fixed positions, preventing any movement.
For retaining walls supporting significant soil loads or garden walls bordering driveways, this rigidity provides necessary strength.
Rock walls vs cut stone walls
The terms “rock wall” and “stone wall” are often used interchangeably, but there’s a practical distinction that affects your project.
- Natural rock walls (fieldstone) use irregularly shaped stones gathered from fields or quarries. These stones require careful selection and fitting but create rustic, organic-looking walls that blend with natural Denver landscapes. Each stone is unique, making the puzzle-solving aspect of building a rock wall both challenging and rewarding.
- Cut stone walls use manufactured or quarried stones with relatively uniform dimensions – squared edges, consistent thickness, predictable shapes. These stack more easily and create cleaner, more formal lines. Cut stone suits contemporary homes, formal gardens, and projects where precise height and alignment matter.
Materials & tools you’ll need
Successful stone wall construction starts with gathering the right materials and tools. Skimping on essentials or using inappropriate stone types leads to frustration and failure.
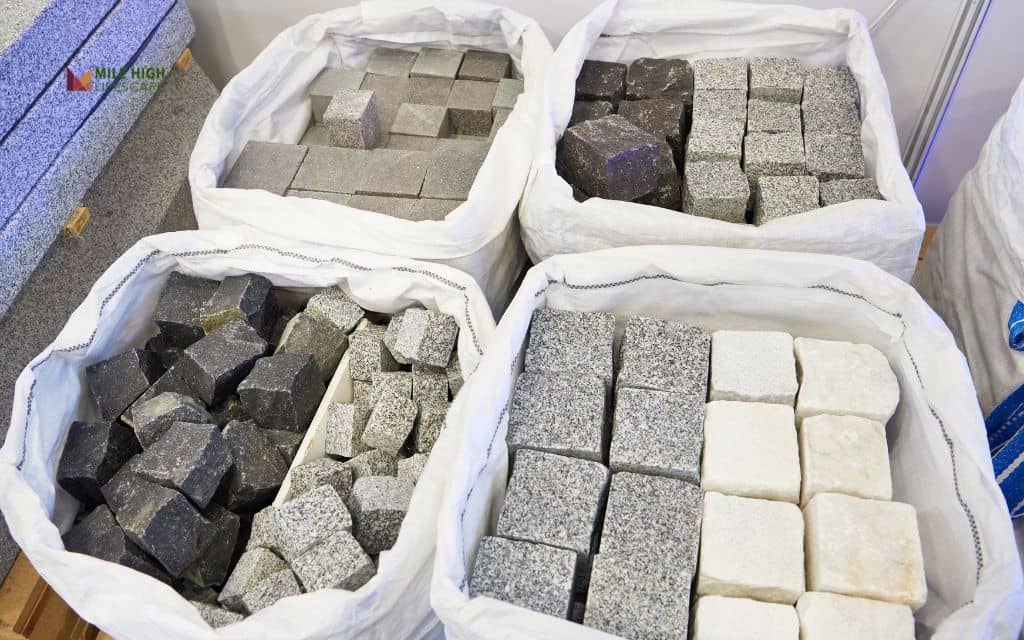
Stone options that work well in Colorado
- Fieldstone remains the most popular choice for Denver gardens. Colorado fieldstone comes in warm earth tones that complement our landscape naturally. Look for stones ranging from softball-size to basketball-size for most garden walls, with some larger anchor stones (2-3 feet across) for the base course.
- Limestone offers durability and workability. It’s relatively soft when freshly quarried, making it easier to shape with a chisel, but hardens over time as it cures. Limestone’s light buff color brightens shaded areas.
- Sandstone provides beautiful color variation from tan to red to brown. Colorado’s native sandstone weathers beautifully and splits along natural planes, making it easier to create flat faces for stone wall building.
- Local Colorado stone sourced from Front Range quarries offers the best value and most natural appearance. Moss Rock, Colorado Red, and Lyons sandstone are regional favorites that blend seamlessly with existing landscapes.
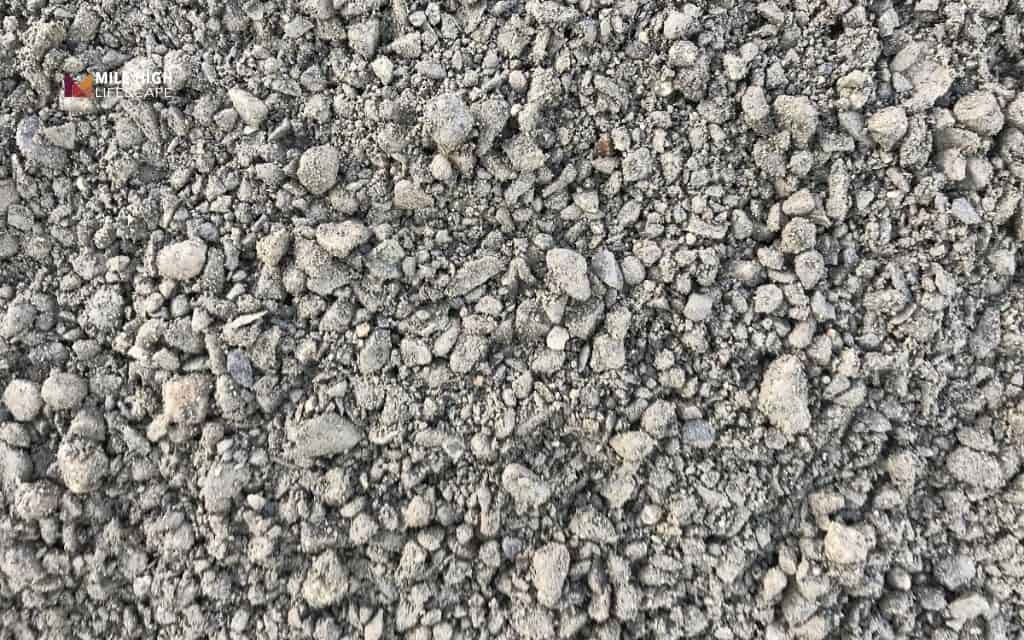
Base & drainage materials
- Crushed gravel (¾-inch minus or Class 5) creates the foundation for your wall. This mix contains gravel pieces and rock dust that compact together into a stable base. Plan for a gravel base 6-8 inches deep for walls under 3 feet, deeper for taller structures.
- Drainage stone (1-2 inch clean gravel) goes behind the wall to prevent water buildup and hydrostatic pressure. This larger gravel allows water to filter down rather than pushing against your wall. Calculate approximately 1 cubic foot of drainage stone per linear foot of wall.
- Geotextile fabric separates drainage stone from clay soil, preventing fine particles from clogging drainage pathways. Use commercial-grade landscape fabric rated for retaining wall use, not lightweight weed barrier that will tear.
Essential tools checklist
- For excavation and base preparation, you’ll need a square-point shovel for digging, a flat shovel for spreading gravel, a hand tamper or plate compactor for compacting base material, and a wheelbarrow for moving materials.
- For stone placement and adjustment, gather a 4-foot level for checking courses, a torpedo level for individual stones, mason’s line and stakes for establishing level reference lines, rubber mallet for adjusting stone position, and pry bar for moving heavy stones safely.
- For shaping and safety, have a brick chisel and mason’s hammer for splitting stones, safety glasses (non-negotiable), heavy work gloves, and steel-toe boots for foot protection.
- Optional but helpful: A come-along or stone tongs for moving very heavy stones, a masonry saw for precise cuts (rental), and kneepads for comfort during long working sessions.
Step-by-step – How to lay stone wall
This systematic approach accounts for Denver’s climate challenges and ensures your wall stands the test of time. Don’t skip steps because each builds on the previous one.
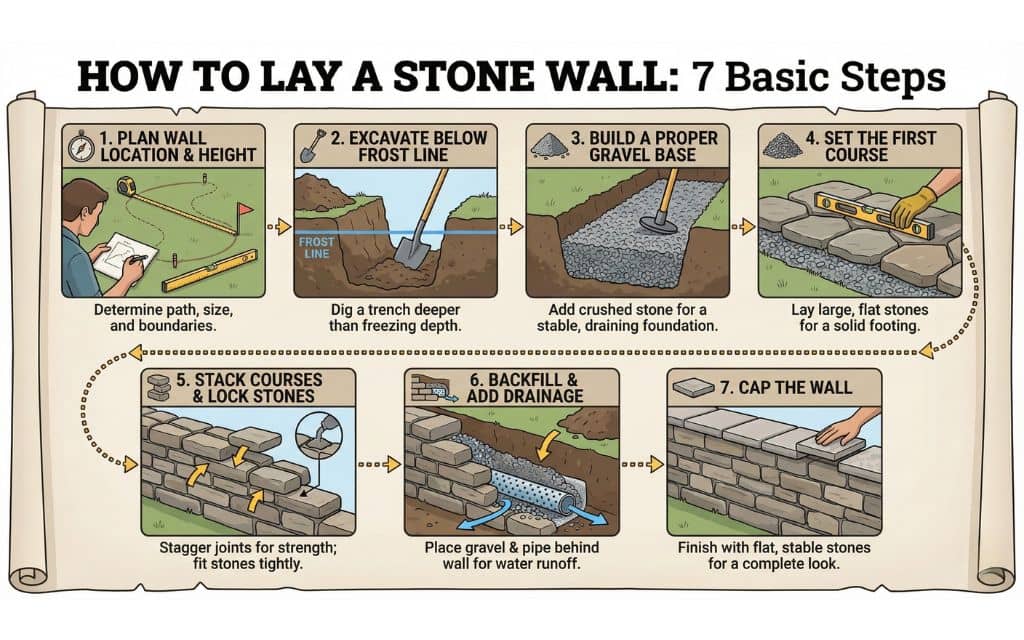
Step 1: Plan wall location and height
Before digging anything, verify your property lines. Walls built on or over property lines create legal disputes and may require removal. Check your property survey or hire a surveyor if boundaries are unclear.
Determine your wall’s purpose and required height. Garden bed walls typically run 18-24 inches high. Slope retention may require 3-4 feet. Anything over 4 feet enters engineering territory in Denver, both for structural safety and code compliance.
Check permit requirements with your local jurisdiction. Denver County requires permits for retaining walls over 4 feet or any wall within setback zones. Suburban municipalities vary widely, some require permits for any wall over 30 inches.
Most garden walls under 3 feet fall under exemptions, but confirm this before starting. Homeowner’s associations often have additional restrictions on wall materials, height, and location.
Consider drainage patterns. Your wall will alter water flow, potentially directing runoff toward your house or a neighbor’s property. Plan appropriate drainage routes before construction.
Step 2: Excavate below frost line
Denver’s frost depth (the depth at which soil freezes in winter) varies from 36 inches in protected areas to 48 inches on exposed sites. When soil freezes, it expands. If your wall’s foundation sits above the frost line, expanding soil literally lifts the wall, pushing it out of alignment season after season.
For walls under 2 feet tall, dig down 12-18 inches for the gravel base. For walls 2-4 feet tall, excavate 18-24 inches. Taller walls require engineering specifications, but typically need 30-36 inch excavations minimum.
Dealing with clay soil: Denver’s expansive clay is the nemesis of stable structures. When excavating, you’ll often encounter hard-packed clay that resists shovels.
Use a mattock or pickaxe to break through. Remove all clay from the foundation area. Clay’s expansion and contraction causes the very movement your gravel base is designed to prevent.
Step 3: Build a proper gravel base
Start with 6-8 inches of crushed gravel. Spread it evenly across the excavation using a rake or flat shovel. Don’t dump it all in one spot – uniform distribution matters.
- Compact in layers: Pour 3-4 inches, compact thoroughly, add another 3-4 inches, compact again. Use a hand tamper for small walls or a plate compactor for walls over 20 feet long. Compaction transforms loose gravel into a solid, stable mass. Under-compacted gravel settles over time, causing your entire wall to sink and tilt.
- Level for long-term stability: Use a long level and straight board to check that your compacted base is level side-to-side and has the desired slope front-to-back. Most walls should lean slightly into the slope (called “batter”) – about 1 inch of setback per foot of height. This backward lean counteracts soil pressure from behind.
Step 4: Set the first course
The first course determines everything above it. Take your time here, rushing this stage guarantees problems later.
- Use your largest, flattest stones first: The base stones carry the entire weight of the wall, so they must be substantial. Look for stones with at least one flat side for ground contact and another reasonably flat side facing up. Stones 12-24 inches across work well for base courses.
- Set stones with a slight inward lean (batter). Position each stone so its top surface tilts back into the slope by roughly 1 inch per foot of rise. This counteracts the forward pressure of soil behind the wall. A wall with proper batter looks stable and feels solid; one without batter appears ready to topple forward.
- Check level and alignment constantly. Use your 4-foot level to verify that the course is level side-to-side along the wall’s length. Individual stones can vary slightly, but the overall top surface of the first course should be level horizontally while maintaining that backward tilt. String a mason’s line from end stakes to establish a consistent reference height.
Step 5: Stack courses and lock stones together
How to construct a stone wall that stays together for decades comes down to proper stone placement in courses 2 and higher.
- Stagger vertical joints: This is the golden rule of stonework. Never place stones so vertical joints align from course to course. This creates weak planes where the wall can split. Instead, position each stone to bridge the joint below it, like bricks in a wall. Each stone should overlap the two stones beneath it by at least 4-6 inches on each side.
- “Hearting” with small stones: Between larger face stones, pack small stones (fist-sized and smaller) into the wall’s interior. This “hearting” or “infill” locks face stones in place, fills voids, and creates internal structure. Don’t leave hollow pockets inside the wall.
- Avoid straight vertical seams: Evaluate the wall face from 10 feet away periodically. You shouldn’t see continuous vertical lines running up the wall face. If you do, you’ve created weak zones. Remove and replace stones to stagger joints properly.
For each course, maintain that slight backward lean. As walls rise, they should noticeably tilt into the hillside. A wall 3 feet tall should lean back 3-4 inches from bottom to top.
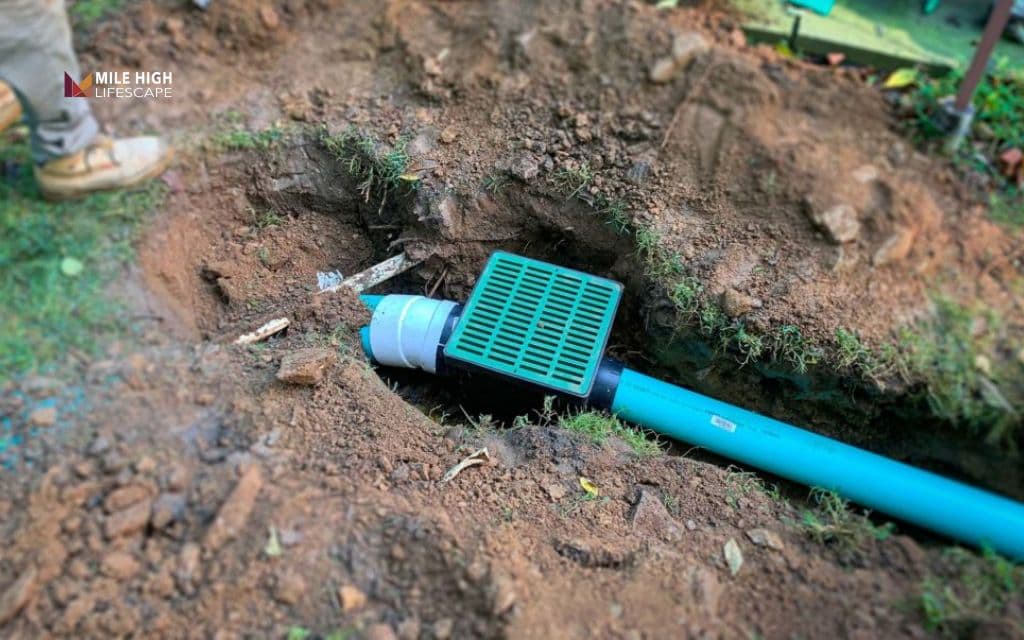
Step 6: Backfill and add drainage
Water is your wall’s greatest enemy. Proper drainage prevents 90% of wall failures in Denver.
As you build courses, periodically backfill behind the wall. Don’t wait until the wall is complete to add drainage material. You won’t be able to compact it properly.
Place geotextile fabric against the clay soil behind your wall, running it up at least as high as the finished wall height. Fold it over the top of the drainage stone when backfilling is complete.
Add drainage stone (1-2 inch clean gravel) behind the wall in a zone 12-18 inches wide. This creates a permeable zone where water percolates downward rather than pushing against the wall. Every 2-3 courses, add and lightly compact drainage gravel.
Preventing hydrostatic pressure: When water saturates soil behind a wall with no drainage, it exerts tremendous outward pressure (hydrostatic pressure). This force can push even well-built walls forward and eventually cause collapse. Your drainage stone and fabric system eliminates this pressure by allowing water to drain before it builds up.
Step 7: Cap the wall
The top course requires different considerations than middle courses.
Choose cap stones that are larger and flatter than your typical wall stones. Cap stones see the most weathering and potential frost heaving, so they must be substantial. Look for stones 18-30 inches long and 12-18 inches wide with good flat tops.
Cap stones should span across the wall width, tying front and back faces together. Where possible, select capstones that are heavy enough to resist movement (50+ pounds each). Place them tightly together with minimal gaps.
Lock the top course by ensuring each cap stone bridges joints in the course below and makes solid contact with multiple stones. Use your largest, most stable stones here – wobbly cap stones ruin an otherwise solid wall.
Final stability checks: Walk along the wall and press firmly on cap stones. They shouldn’t rock or shift. Push against the wall face at various heights – it should feel solid, not loose or springy. If you feel movement, investigate and reposition stones until stability is achieved.
How to lay a rock wall on a slope or near a house
Special situations require modified techniques. Understanding these variations prevents costly mistakes.
Building a rock wall on sloped yards
Slopes complicate wall construction but also make walls more necessary for erosion control and usable terracing.
- Terracing strategies: Rather than building one tall wall (which requires engineering and often permits), create multiple shorter walls stepping down the slope. Three 2-foot walls are safer, easier, and more attractive than one 6-foot wall. Space terraces 6-10 feet apart to create planting beds between walls.
- Stepping walls with grade: Don’t try to keep wall height constant on sloped ground. Instead, excavate the foundation level but let the wall height vary with grade. Your foundation trench might be 18 inches deep at the uphill end and 12 inches at the downhill end, but the trench bottom should be level.
- Preventing downhill movement: On steep slopes, walls tend to creep downhill over time. Counter this by angling the wall back into the slope more aggressively (2 inches of lean per foot of height instead of 1 inch), extending the foundation deeper at the downhill end where forces are greatest, and installing “deadmen” – large stones buried into the slope behind the wall that anchor it in place.
Rock wall near or on a house
Walls adjacent to home foundations require special care to avoid moisture and structural issues.
- Clearance from foundation: Never build a stone wall directly against your home’s foundation. Maintain at least 12-18 inches of clearance. This gap allows air circulation, prevents moisture from wicking into your foundation, provides space for drainage, and allows access for foundation inspections and repairs.
- Drainage considerations: Any wall near a house must direct water away from the foundation, not toward it. Slope the ground between the wall and house away from the foundation (minimum 6 inches of drop over 10 feet). Install French drains or surface drains if needed to intercept water before it reaches the foundation.
- When engineering is required: Contact a structural engineer when building walls taller than 4 feet near a house, constructing any wall that could impact foundation drainage or stability, adding stone veneer to the home structure, or working in areas with unstable soil or significant slope.

Common stone wall mistakes
Learning from others’ mistakes is cheaper than making them yourself. These four errors account for most wall failures in Denver.
Mistake 1: Skipping the base
The most common and catastrophic error. Clay expands and contracts with moisture, shifting everything above it.
During freeze-thaw cycles, ice crystals forming in clay literally heave the soil upward. Without a stable gravel buffer, your wall moves with every season. Within 2-3 years, you’ll see tilting, stone displacement, and eventual collapse.
The fix requires complete demolition and rebuilding with proper foundation. Never skip the gravel base, regardless of how stable the soil looks when dry.
Mistake 2: Building too tall for DIY
Tall walls carry exponentially more weight and soil pressure than short walls. A 6-foot wall isn’t twice as hard as a 3-foot wall – it’s 4 to 5 times harder due to increased loads and stability requirements. Wall height limits exist for safety, not arbitrary regulation.
Safety and collapse risks: Improperly built tall walls can collapse suddenly, particularly after heavy rain or rapid snowmelt when soil is saturated. A collapsing 5-foot stone wall can cause severe injury or death. Moreover, if your wall fails and damages neighboring property, you’re liable for repairs and potential lawsuits.
Mistake 3: Poor drainage behind the wall
- Bulging and blowouts: When water accumulates behind a wall with no escape route, pressure builds. You’ll see the wall face bulge outward, stones shift, and eventually sections blow out completely. This happens during spring snowmelt or after heavy rains.
- Freeze damage: Water trapped behind walls freezes and expands in winter, exerting forces that can displace even large stones. Repeated freeze-thaw cycles progressively worsen the damage.
The fix is simple but non-negotiable: install drainage stone, geotextile fabric, and (for taller walls) perforated drain pipe.
Mistake 4: Using the wrong stone size
- Too small = instability: Small stones shift easily, don’t lock together effectively, and require enormous effort to stack into stable configurations. Use small stones for hearting and gap-filling, but never as primary structural elements.
- Too uniform = weak interlock: Stones that are all the same size and shape create uniform joints that don’t interlock well. You want variety: large anchor stones for base courses and corners, medium stones for wall faces, smaller stones for filling and hearting. This size variation creates the three-dimensional puzzle that locks into a solid structure.
Conclusion
When done correctly, learning how to lay stone wall allows you to control erosion, create beautiful garden structure, and add long-term value to your Denver property. The difference between success and failure lies in understanding our unique climate challenges and following proven construction methods.
Start with a small, manageable project: a garden bed wall 18-24 inches high and 10-15 feet long lets you master the techniques without overwhelming complexity or expense. As your skills grow, tackle larger projects with confidence.
Remember these core principles: excavate below frost line, build a compacted gravel base, maintain backward lean for stability, stagger joints to lock stones together, and install drainage behind every wall. These aren’t optional niceties – they’re the foundation of durable stonework.
__________
Mile High Lifescape transforms Denver yards with professional landscape rock installation – from natural stone walls and rock gardens to boulders and erosion control.
Our experienced team handles design, material selection, and installation while working within your budget and timeline. We manage the heavy lifting, drainage planning, and Denver-specific climate considerations so you get lasting results without the guesswork.
Mile High Lifescape
Phone: (303) 877-9091
Email: hello@milehighlifescape.com
Address: 1007 S Federal Blvd Ste A, Denver, CO 80219, United States
Frequently asked questions (FAQs)
How deep should a stone wall foundation be in Denver?
Garden walls under 2 feet tall need 12-18 inches of compacted gravel base below grade. Walls 2-4 feet require 18-24 inches. Denver’s frost depth ranges from 36-48 inches, but the gravel base (which doesn’t freeze and expand like clay) prevents frost heaving even when not extending to full frost depth.
Can I build a stone wall without mortar?
Yes. Dry-stack stone walls are ideal for Denver because they flex with soil movement during freeze-thaw cycles rather than cracking like mortared walls. For garden applications under 4 feet tall, dry-stack construction is actually preferable and more durable than mortared construction on expansive clay soils.
How tall can a DIY stone wall be safely?
Limit DIY projects to 3-4 feet maximum height. Beyond this, structural engineering becomes necessary for safety and code compliance. Most Denver-area jurisdictions require permits and engineered plans for retaining walls over 4 feet. Three-foot walls are manageable, safe, and usually exempt from permitting.
What’s the best stone for building a rock wall?
Local Colorado fieldstone offers the best combination of cost, durability, and natural appearance. Sandstone, limestone, and moss rock work well in our climate. Avoid soft, flaky stones that spall (flake apart) during freeze-thaw cycles. Test stones by striking them – they should ring solidly, not crumble.
How long does a stone wall last in Colorado’s climate?
Properly built stone walls with adequate foundations and drainage last many years in Colorado. Walls without proper gravel bases or drainage typically fail within 3-10 years due to frost heaving and hydrostatic pressure. The investment in correct construction methods pays off in decades of maintenance-free performance.
