The concerns are real. How do you move big rocks by hand without injury? Will you damage your irrigation system or tear up the lawn? Do you need expensive equipment, or can you accomplish this with tools already in your garage?
This guide provides step-by-step methods about how to move big rocks safely. You’ll learn techniques that professional landscapers and experienced DIYers use daily with all advice accounts for garden challenges. You will recognize clear signals for when moving large rocks by yourself becomes dangerous and professional help makes sense.
Why moving large stones is risky
Moving a heavy rock creates multiple injury opportunities. Understanding these risks helps you prepare properly and work safely.
- Back strains: Lower back muscles tear under sudden loads. Herniated discs occur when people bend and twist simultaneously while lifting. These injuries sideline you for weeks and sometimes require months of physical therapy.
- Crushed fingers and toes: A shifting boulder pins your hand against the ground. A rock you thought was stable rolls onto your foot. Pinched hands occur when rocks settle unexpectedly while you adjust positioning. Steel-toed boots and heavy work gloves reduce but do not eliminate these risks.
- Slips, trips, and falls: You step backward while pulling a sled loaded with rock and catch your heel on a sprinkler head. You lose balance on a slope while pushing a dolly. You stumble over loose stones scattered across your work area. Falls at altitude hit harder because you fatigue faster here than at sea level.
Step 1: Assess the rock and the route
Estimate weight before you move anything
Rock weight determines which moving method you choose.
Calculate approximate weight using this formula: length (feet) × width (feet) × height (feet) × 165 pounds.
A rock measuring 2 feet × 1.5 feet × 1 foot weighs roughly 495 pounds (2 × 1.5 × 1 × 165). That same calculation helps you realize that what looks like a “medium” rock actually exceeds safe hand-lifting limits by a factor of four.
Check stability and surroundings
Examine the surroundings for hidden hazards.
- Look for sprinkler lines running through the area. Check for gas line markers, electrical boxes, or cable pedestals.
- Scan for window wells, basement windows, or glass doors in the rock’s potential path.
- Identify any walls, fences, or plantings you need to protect.
A rolling rock does not discriminate between weeds and expensive perennials. Mark off zones where the rock absolutely cannot go, then plan routes that avoid these areas.
Plan your path
Trace the route from current location to final destination. Measure the distance. Count how many elevation changes you must navigate. Identify spots where you can rest the rock safely if you need to pause and regroup.
Designate specific positions for yourself and any helpers at each stage. Decide who stands on the uphill side and who guides from downhill. Determine hand signals since verbal communication fails when you concentrate on keeping tons of rock under control. Mark rest positions with stakes or spray paint so everyone knows where to pause.
Step 2: Basic principles: leverage, rolling, sliding
The lever principle
A lever multiplies your force by extending the distance you push. A 6-foot pry bar with a fulcrum positioned 6 inches from the rock lets you lift the rock’s edge with roughly one-tenth the force that direct lifting requires.
Position a solid wood block or small flat stone as your fulcrum. Slide the pry bar under the rock’s edge as far as possible. Press down on the long end of the bar. The rock’s edge rises an inch or two. Maintain pressure while a helper slides a wood shim or wedge under the raised edge. Release pressure. The rock now sits supported, ready for the next move.
Repeat this process from different angles to gradually walk the rock where you want it. Each lift moves the rock incrementally. Each movement stays under control. Your back never takes the full load.
Rolling vs sliding
Rolling works best on firm, level ground. Round rocks roll naturally. Flat or irregular rocks need to be placed on pipes or cylindrical logs that act as rollers. Rolling reduces friction dramatically.
Sliding suits slopes, soft soil, and situations where you want maximum control. A rock sliding on a tarp or plywood sled stays where you put it when you pause.
Sliding protects lawns better than rolling because weight distributes across the sled instead of concentrating under the rock.
How to move big rocks: 9 safe ways without heavy equipment
Pry and pivot with a long bar
- Tools needed: 6 to 8-foot steel pry bar (longer is better), hardwood or stone block for fulcrum, wood wedges or shims
- Best for: Lifting one side of a rock to slip in pipes or boards underneath, nudging rocks a few inches at a time, breaking rocks free from partially buried positions
- Technique: Position your fulcrum 4 to 8 inches from the rock’s edge. Insert the pry bar as far under the rock as possible. Press down on the bar’s far end with steady pressure. The rock’s edge lifts. Maintain pressure while your helper slides a wedge under the rock. Lower the bar slowly. Move to a different angle and repeat.
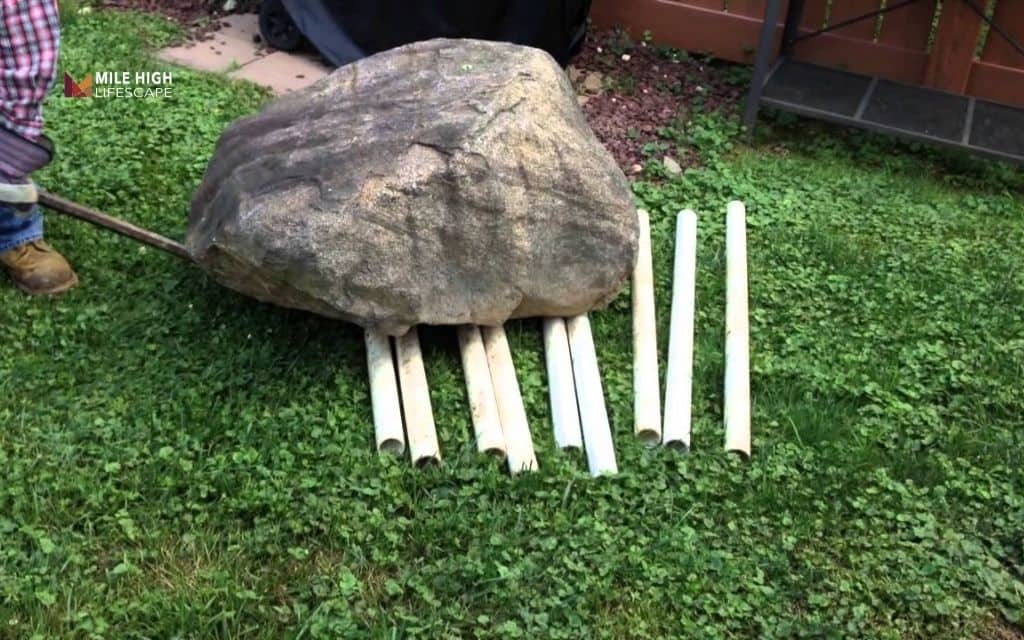
Roll on pipes
- Tools needed: Three or four sections of sturdy pipe (metal conduit or PVC pipe 2 to 3 inches in diameter work well), a thick plank or 2×10 board slightly longer than the rock
- How it works: Place 2 pipes parallel under the plank. Position the rock on the plank. Push or pull the plank forward. As the rear pipe emerges behind the rock, move it to the front. Continue this leapfrog pattern across your yard.
- Best conditions: Level or gently sloping compacted soil, concrete patios, driveways, and garage floors. This method shines when you need to move rocks across finished surfaces without scratching them.
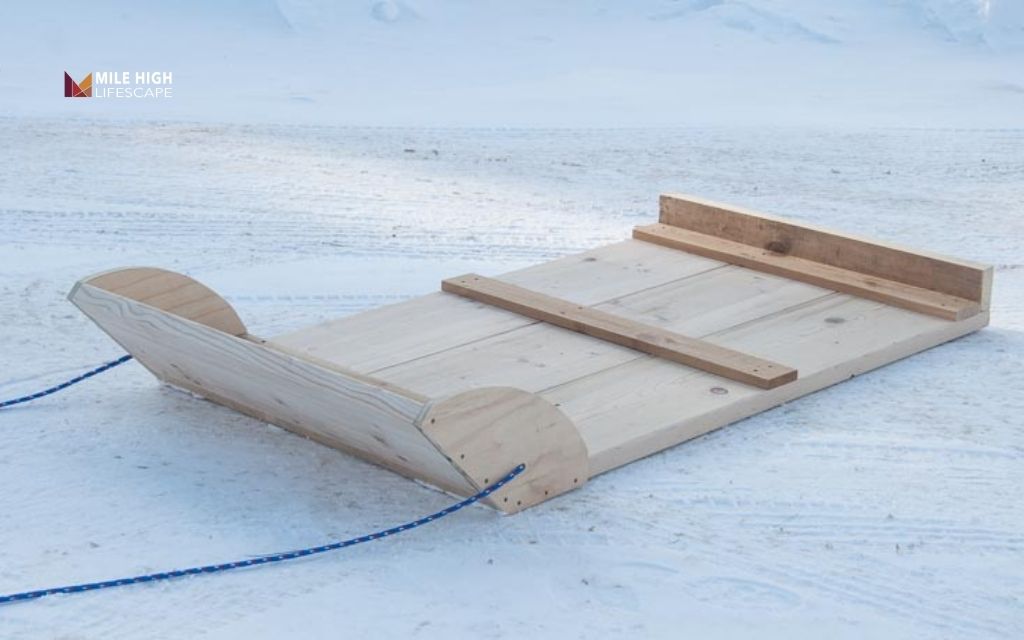
Slide on a sled, tarp, or stone boat
- Tools needed: Heavy-duty plastic sled, thick tarp, plywood sheet (¾ inch or thicker), or purpose-built stone boat if you move rocks regularly. Add strong rope or ratchet straps for pulling.
- Best applications: Protecting lawns and garden beds from rock gouges, moving rocks down slopes with maximum control, dragging multiple medium rocks in one trip.
- Technique: Position the sled next to the rock. Use a pry bar or dolly to tip the rock onto the sled. Secure with straps if the rock is large enough to shift. Attach rope to the sled’s front. Pull by hand for smaller rocks, or hitch to a garden tractor or ATV for heavier loads.
Use a heavy-duty dolly or rock cart
- Tools needed: Appliance dolly rated for 600+ pounds, or specialized rock dolly with wide base, plus ratchet straps or bungee cords to secure the load
- Best for: Moving rocks up or down 2 to 4 steps, navigating curbs, transporting rocks short distances on pavement
- Loading technique: Tip the rock backward using a pry bar while a helper slides the dolly’s lip underneath. Lower the rock onto the dolly’s platform. Strap it securely. Tilt the dolly back carefully until the rock’s weight balances over the wheels.
Wheelbarrow or garden cart for medium rocks
- Weight limit: Use this method only for rocks under 100 to 150 pounds. Check your wheelbarrow’s rated capacity – most homeowner models max out at 200 pounds total, and you do not want to test those limits with stone.
- Preparation: Inflate tires to maximum recommended pressure. Verify the tray shows no cracks or rust damage. Have a helper available for loading and unloading – tipping a loaded wheelbarrow requires control that solo operation rarely provides.
- Loading method: Position the wheelbarrow next to the rock. Use a pry bar to lift the rock’s edge while your helper slides a board from the rock to the wheelbarrow, creating a ramp. Roll or slide the rock up the board into the wheelbarrow.
“Walk” the rock with short levers and blocks
- Tools needed: Short pry bar or digging bar, assortment of wood blocks in various thicknesses, patience.
- Best for: Extremely heavy rocks that exceed other methods’ capacity, situations where you cannot use wheels or sleds, precise positioning where you need to set rocks within inches of their final spots.
- Time investment: This technique moves rocks slowly. But it works when nothing else does, and it requires minimal equipment investment.
Method: Lift one edge of the rock with the pry bar. Slide a block underneath. Lower the rock. Move to the opposite edge. Lift and block. The rock now sits higher. Return to the first side. Lift again and add a second block. Continue this pattern.
As the rock rises, it also rotates. Use this rotation to steer the rock. Lift the side you want to move forward. The rock pivots slightly. Over multiple lift-and-block cycles, the rock “walks” in your chosen direction.
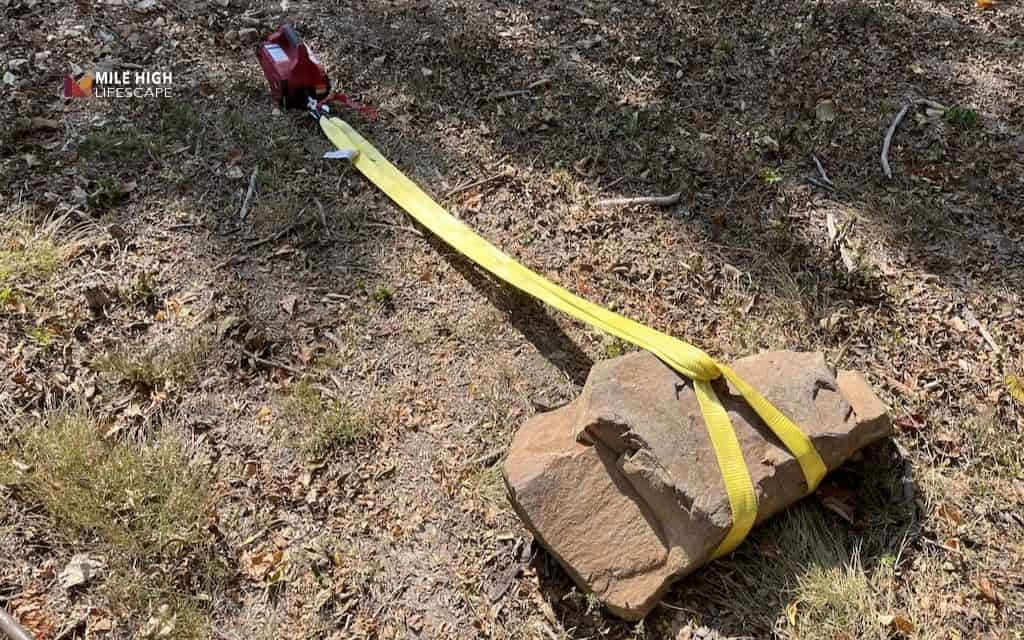
Ratcheting come-along or hoist
- Tools needed: Hand-operated come-along (cable puller) rated for twice your rock’s estimated weight, nylon lifting straps (never chain on irregular rocks – it slips), secure anchor point
- Anchor options: Mature tree with trunk diameter exceeding 12 inches, vehicle hitch on a truck parked with emergency brake set, buried deadman anchor (post or log buried perpendicular in a 3-foot trench)
- Setup: Wrap nylon straps around the rock, creating a cradle rather than a single choke point. Attach the come-along between the strap and your anchor. Tension the cable until it just becomes taut. Ratchet slowly. The rock drags a few inches. Reset if needed and ratchet again.
Moving rocks with simple ramps
- Applications: Loading rocks into a pickup truck bed, moving rocks up or over retaining walls, positioning rocks on top of raised garden beds
- Materials: 2×12 planks for ramps (stronger than 2×10), blocks or concrete pavers to support the ramp at intervals, cleats nailed crosswise on the ramp every foot to prevent slipping
- Technique: Build your ramp at the shallowest angle your space allows. Steeper ramps exponentially increase the effort required. Secure the top of the ramp so it cannot slip. Place the rock on a dolly, pipe rollers, or sled. Slowly winch or pull the rock up the ramp. Use the come-along or a vehicle if the rock and ramp length warrant it.
Team lift and “bucket brigade” for many medium stones
- Weight range: This method works for rocks between 50 and 80 pounds.
- Proper lifting form: Stand with feet shoulder-width apart. Squat down by bending knees, not waist. Grip the rock with both hands. Keep the rock close to your body. Drive up through your legs while keeping your back straight. Never twist while holding weight.
- Bucket brigade pattern: Position 2 people at the rock source, 2 at the destination, and additional people spaced between if the distance warrants. First pair lifts rock to second pair. Second pair moves it to third pair. Continue until the rock reaches its final position. Rotate positions every 15 minutes so everyone gets breaks from the hardest lifting.
Extra tools that make moving large stones easier
Helpful hand tools
- Digging bar: A 6-foot steel bar with a wedge point breaks rocks free from partially buried positions. Drive it under the rock at multiple angles to loosen compacted soil. This tool outperforms shovels for separating stone from earth.
- Mattock: The combination of ax blade and adze cuts through roots that hold rocks in place.
- Shovel: Essential for removing soil from around buried rocks before attempting to move them. A sharp spade cuts through our clay soil better than rounded garden shovels.
- Wedges and shims: Collect an assortment of wood pieces in different thicknesses. Hardwood wedges last longer than pine. Metal wedges slip less than wood but can chip rocks. Buy a set of plastic shims at any hardware store for pennies.
- Measuring tape: Critical for estimating rock weight using the formula provided earlier. Measure three dimensions before deciding which moving method to attempt.
Mechanical helpers
- Come-along and chain hoist: Hand-operated winches that provide 2,000 to 4,000 pounds of pulling force. Models cost $30 to $150 depending on capacity. A single tool eliminates the need for multiple helpers on many projects.
- Farm jack or Hi-Lift jack: Designed for lifting vehicles, these jacks also lift rocks incrementally. Raise the rock a few inches, block underneath, lower the jack, reset it, and lift higher. Repeat until the rock sits at the height you need.
- Garden tractor or compact utility vehicle: If you own a riding mower or small utility vehicle, it pulls sleds loaded with rocks across level ground. Attach to the sled with a chain long enough (15 to 20 feet) that you can see the load behind you. Use low gear and avoid steep slopes.

Conclusion
Moving large rocks transforms from intimidating obstacles to manageable projects once you understand the fundamentals. Respect the rock’s weight and your body’s limits. Use leverage, rolling, and sliding instead of brute-force lifting. Plan your path thoroughly and protect your yard’s existing features. Recognize when a project exceeds your abilities and professional help provides better solutions.
For nearly two decades, Mile High Lifescape has served the Denver Metro area with professional landscape rock services.
Our team handles rock placement projects of all sizes with the proper equipment and expertise. Contact us at (303) 877-9091 or hello@milehighlifescape.com when your rock-moving project requires professional assistance.
Frequently asked questions (FAQs)
How do you move a large rock by hand without equipment?
Use a long pry bar with a fulcrum to lift one edge of the rock incrementally. Slide wedges underneath to support each lift. Position a sled or tarp under the rock, then pull it to the destination. This method works best when combined with patience and proper body mechanics.
What is the safest way to move large stones in a small yard?
Place the rock on a sled or heavy tarp and pull it along your planned path. This protects your lawn and gives you control on slopes. Always keep yourself positioned uphill from the rock so it moves away from you if it breaks free.
Can one person move a heavy rock, or do I always need help?
One person can move rocks using leverage tools like pry bars, sleds, and dollies. The rock’s weight determines whether you need help – lighter rocks move solo, while heavier rocks require either a helper or mechanical advantage tools like a come-along. Never work alone with rocks heavy enough to cause injury if they shift unexpectedly.
Is it better to roll or slide big rocks?
Roll rocks on firm, level surfaces where friction is high. Slide rocks on slopes or soft soil where you need control. Rolling moves rocks faster with less effort, while sliding prevents runaway rocks and protects landscaping underneath.
What’s the best tool for moving large rocks without heavy machinery?
A long steel pry bar provides the most versatility for moving rocks by hand. It lifts edges, creates space for sleds or rollers, and multiplies your lifting force through leverage. Combine it with a plastic sled and wood wedges for a complete moving system.
How do I move big rocks on a slope safely?
Use a sled or stone boat to control the rock’s descent. Position yourself uphill from the rock at all times. Secure the rock to the sled with straps, and descend slowly using the sled’s friction as a brake. Never roll rocks downhill where they could gain momentum.
Will moving large rocks damage my lawn or irrigation system?
Moving rocks directly on turf creates ruts and can tear grass. Use a sled, plywood sheets, or wide boards to distribute weight and protect the lawn. Plan your route to avoid irrigation lines, which typically run 6 to 8 inches below the surface.
