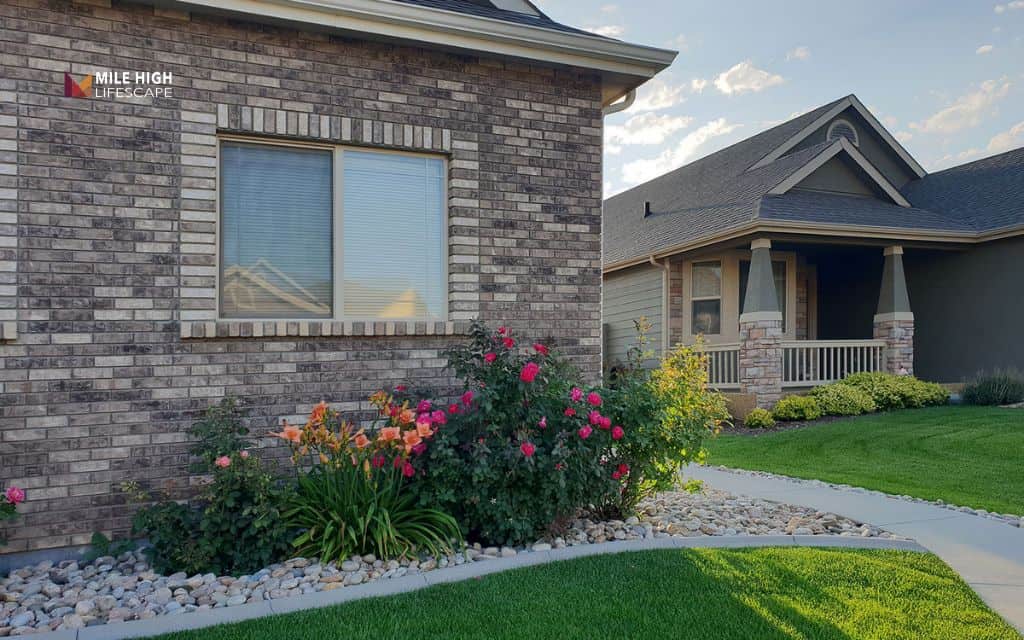
A rock border around a house foundation is a graded strip of soil topped with gravel, river rock, or similar stone. This border improves drainage, protects siding, and creates clean lines around your home. The key word is “graded.” Without proper slope, rocks become part of the problem instead of the solution.
In this complete guide, we’ll walk you through everything you need to know about putting rock border around house foundations in the Mile High City.
You’ll discover when rocks dramatically outperform mulch near foundations, how to properly grade and install a rock border that actually works (not just looks pretty) to protect your home.
Should you put a rock border around your foundation?
Yes, in most cases. A properly graded rock border is one of the best ways to move water away from your house and reduce pest and mold issues.
But effectiveness depends entirely on execution.
The rock border must work with correct grading, functional gutters, and soil management. Install rocks over poor grading and you trap water against your foundation instead of directing it away. The rocks hide the problem while moisture seeps into basement walls.
The right approach starts with fixing drainage problems before adding decorative elements. Slope the soil away from your house.
Verify your gutters carry water at least 6 feet from the foundation. Then add rocks as the final layer that enhances the drainage system you’ve already built.
Benefits of putting rock border around house foundations
Improved surface drainage
Gravel and river rock allow water to pass through quickly instead of pooling against your wall. Unlike soil or mulch that becomes saturated, rock creates air space that lets water flow downward and outward. This rapid percolation moves moisture away from foundation walls before it can seep through cracks or joints.
Reduced splash-back and siding damage
Rain hits hard surfaces and splashes upward. Bare soil near your foundation means every storm launches mud onto stucco, brick, or wood siding. Over time, this splash-back stains surfaces and accelerates wear on paint and sealants.
Rocks absorb the impact of falling water. The irregular surface breaks up splash patterns and prevents mud from coating your exterior walls. Your siding stays cleaner and lasts longer.
Less pest habitat near the house
Wood mulch creates ideal conditions for insects and rodents. The decomposing organic matter stays moist and provides food and shelter. Termites thrive in mulch piled against foundations. Mice burrow into it during winter.
Rock borders eliminate these habitats. Termites ignore stone. Mice prefer softer nesting materials. The dry, open space under rocks discourages most foundation pests.
This advantage matters in Denver where landscaping practices affect pest pressure across multiple properties.
Fire-wise advantages in a dry climate
Non-combustible rock strips create a defensible space zone near your house.
Colorado’s increasing wildfire risk makes this benefit more relevant every year. While a three-foot rock border won’t stop a major fire, it reduces ignition risk from blowing embers and provides firefighters a safer approach to your home.
Properties with xeriscaping and rock borders near structures fared better than those with wood mulch and dense vegetation against walls. Fire-wise landscaping starts at the foundation and extends outward in zones of decreasing combustibility.
Low-maintenance curb appeal
A clean rock border provides modern aesthetic appeal without annual replacement costs.
Mulch degrades, fades, and needs refreshing every spring. Rock stays consistent year after year. Weeding requirements drop when you combine rock with proper fabric underlayment.
The visual effect works well with Denver’s natural landscape aesthetic.
River rock echoes Colorado streambeds. Gravel complements mountain architecture. Both options look intentional and finished rather than neglected. Your home’s exterior appears well-maintained with minimal ongoing effort.
Best rocks and materials for foundation borders
Gravel (crushed rock)
Crushed gravel is the workhorse of foundation borders and for good reason – those angular pieces interlock naturally, creating a stable surface that’s excellent for drainage and comfortable to walk on.
The sharp edges keep the stones from rolling or shifting, which means your rock border stays where you put it even on slight slopes.
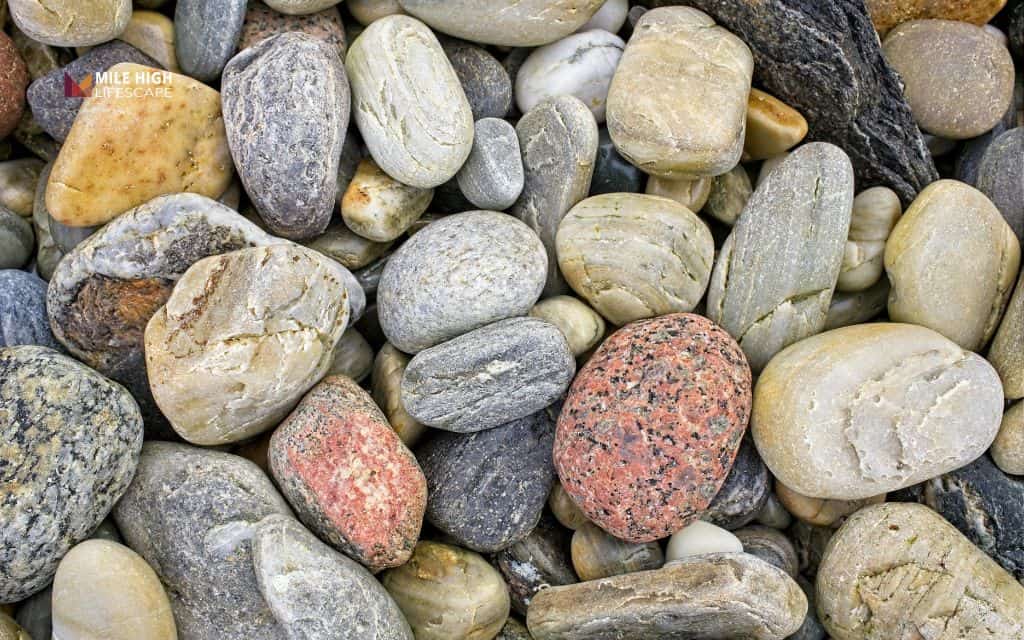
River rock
If crushed gravel is the reliable workhorse, river rock is the show horse – smooth, rounded stones that catch light beautifully and give your foundation border that polished, high-end landscape look.
These naturally tumbled stones excel at creating the dry creek bed aesthetic that’s become hugely popular in Denver landscaping, and they integrate seamlessly with xeriscapes and native plant gardens.
Other stone options
- Pea gravel works in contained, flat areas where small, smooth stones create a finished look. Use only in borders with substantial edging and minimal slope.
- Decorative rock blends combine colors and sizes for custom appearances. These mixes often include red, tan, and gray stones that complement Colorado architecture. The varied texture adds depth to landscape design while maintaining drainage function.
- Larger cobbles serve as edging or transitions between rock types. 4 to 8-inch stones create visual boundaries and prevent smaller rock from spreading.
Rocks vs mulch
Each material serves different purposes in landscape design. Understanding these differences helps you choose correctly for each area around your home.
Drainage and structure
Rocks excel at moving water away from foundations. The open structure allows rapid percolation and prevents saturation.
Mulch absorbs water and can hold moisture against foundation walls. For the critical six-foot zone around your house, rocks provide superior drainage performance.
Pest resistance
Decomposing wood mulch attracts termites and provides habitat for other insects. Rock remains inert and offers no food value. Rodents prefer the soft, moist environment under mulch to the hard, dry conditions under rock. This difference matters most where organic material contacts your foundation.
Fire safety
Rock is non-combustible. Mulch ignites easily and can carry fire to your home during wildfire events. Denver’s increasing wildfire risk makes this distinction critical for properties near open space or in fire-prone neighborhoods.
Soil improvement
Mulch decomposes to enrich soil and support plant growth. This benefit applies to garden beds but works against you near foundations where you want minimal plant growth. Rock keeps the area inert and discourages weeds.
Maintenance requirements
Mulch requires annual replacement as it breaks down and blows away. Fresh mulch costs money and time every spring. Rock lasts indefinitely with minimal maintenance beyond occasional cleaning and topping up.
How to install a rock border around your house foundation
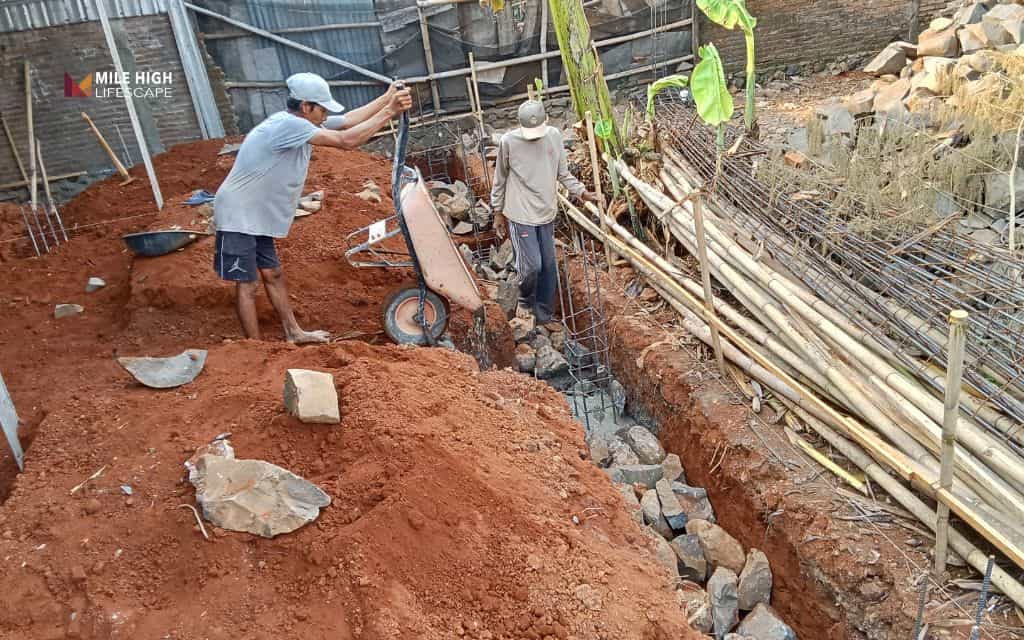
Step 1: Inspect and fix grading
Measure the slope from your foundation using a four-foot level and tape measure. Place the level against the house with one end touching the wall. Lift the outer end until the bubble centers, then measure the gap at that point. Divide by four to get slope per foot.
Target 6 inches of drop over 10 feet, or one inch per foot for the first 6 feet. Add soil where the ground slopes toward your house. Remove soil where it sits flat or slopes back. Compact added soil in two-inch layers using a hand tamper. Denver’s clay soil compacts best when slightly moist, not soaked or bone dry.
Step 2: Address drainage sources
Extend downspouts at least 6 feet from your foundation using solid drain pipe or splash blocks. Run a hose on the roof to test water flow during installation. Check sump pump discharge lines and move them away from the border zone.
Identify water flow from neighboring properties. Address these issues before installing rock or the border will fail regardless of proper grading.
Step 3: Mark out your rock border
Plan 18 to 36 inches width depending on available space and water volume. Narrow borders work for tight side yards. Wider borders handle more drainage and provide stronger visual impact.
Mark the outer edge using spray paint or a garden hose. Leave access to HVAC units, hose bibs, and utility meters. Match width on all sides for consistent appearance.
Step 4: Prepare the base
Remove grass, weeds, and roots within the marked zone. A flat spade cuts sod cleanly. Dig out perennial weed roots completely to prevent regrowth through fabric and rock.
Scrape the top inch of soil if it contains high weed seed concentrations. Lightly compact the surface while maintaining slope. Check grade one final time before proceeding.
Step 5: Add fabric
Use permeable, non-woven geotextile fabric, not plastic sheeting. Plastic blocks water and defeats the drainage purpose. Unroll fabric parallel to your foundation, overlapping seams by six inches.
Secure with landscape staples every three to four feet. Leave extra material against the foundation wall to prevent weed growth in gaps. Commercial-grade fabric lasts longer than residential products.
Step 6: Install edging (optional but recommended)
Steel edging provides the cleanest look and greatest longevity. Install slightly below final rock level so the top edge doesn’t show. Aluminum works well for curved borders and costs less than steel.
Edging prevents rock from migrating into the lawn and creates defined borders that look intentional. Skip this step only if the budget is tight, but plan to add it later for easier maintenance.
Step 7: Add rock
Order rock by the ton from landscape supply yards. Calculate quantity: length × width × depth (in feet) × 100, then divide by 2000 for tons. Plan for 2 to 4 inches depth depending on rock size.
Dump rock in multiple piles around your house for shorter wheelbarrow runs. Spread with a rake from the house outward. Maintain the underlying slope as you work. Three inches works for most three-quarter-inch gravel applications.
Step 8: Final checks
Run a hose at each downspout and observe water movement. Water should percolate through rock and flow away from the foundation. Check for pooling on top of rock or along the house wall.
Remove rock and adjust grading in areas where water pools. Fill gaps where coverage looks thin. Observe the border during the next several rainstorms to confirm the system works as designed.
Maintenance: Keeping rock borders working long-term
Annual checkups
- Schedule an inspection each spring after winter freeze-thaw cycles and before summer storm season.
- Look for settled areas where rock depth has decreased. Freezing and thawing causes soil expansion and contraction that works rock into the ground.
- Check for clogged sections where mud, leaves, and organic debris accumulate on top of stones. These materials block water penetration and reduce drainage effectiveness.
- Remove debris before it breaks down and creates soil layers that support weed growth.
- Observe water flow during a rainstorm or by running a hose. Compare current drainage patterns to original installation performance.
- Examine the house foundation for any signs of water damage, efflorescence, or unusual moisture. While these problems might not originate from your rock border, they warrant investigation to determine if the drainage system needs adjustment.
Weed & debris control
- Blow or rake leaves off rock as they accumulate. Decomposing leaves create organic soil that allows weeds to germinate on top of your border.
- Pull weeds that emerge through rock while they’re small. Young weeds remove easily with shallow roots.
- Established weeds develop roots that penetrate fabric and anchor in the soil below, making removal difficult.
- Spot-treat persistent weeds with appropriate herbicides. Choose products labeled for use over landscape fabric. Read and follow all label directions.
When to add more rock or regrade
Top up rock depth every two to three years if coverage drops below approximately two inches. Thin rock allows weeds to reach soil more easily and reduces drainage capacity. Add new rock to restore the original three to four-inch depth.
Regrade when you notice water pooling against your foundation or see exposed soil showing through rock. These signs indicate settlement or erosion has compromised the original slope. Remove rock, correct the grading, and reinstall rock over the improved surface.

DIY vs hiring a pro – how to decide
Great DIY candidates
Single-story homes with accessible perimeter spaces make good DIY projects. You can reach all areas without ladders or specialized equipment. Simple grading requirements mean you’ll move manageable soil volumes.
Properties where current slope comes close to ideal require less earth moving. Minor adjustments using hand tools are reasonable for most homeowners. Renting a plate compactor for a weekend completes the compaction requirement without major expense.
Straight foundation walls and simple architectural shapes simplify layout and rock installation. Fewer corners and transitions mean less cutting and fitting. The project feels straightforward rather than overwhelming.
Call a pro for…
Significant negative grading requires substantial earth moving and proper compaction. Moving large soil volumes by hand is exhausting. Poor compaction leads to settling and drainage failure. Professionals have equipment that makes these tasks efficient and ensures proper results.
Foundation movement evidence or persistent basement water issues indicate problems beyond simple surface drainage. These conditions need proper diagnosis before installing rock borders. Professionals can identify underlying issues and design comprehensive solutions.
Very large homes mean extensive border lengths that multiply labor requirements. Tight side yards where equipment access is difficult also favor professional installation. Contractors have specialized tools and experience working in confined spaces.
Complex drainage integration with French drains, sump pump lines, and underground utilities requires expertise beyond typical homeowner knowledge. Improper integration can damage existing systems or create new problems. Professional installation ensures all components work together properly.
______________
For nearly two decades, Mile High Lifescape has been proudly serving the Denver Metro area as the go-to landscape company. With a reputation for excellence, we offer a comprehensive range of friendly and professional Denver landscape rock services.
Contact us at (303) 877-9091 or hello@milehighlifescape.com for a free consultation now.
Conclusion
Proper grading combined with the right rock border dramatically reduces moisture issues and upgrades your home’s curb appeal. The system works only when both components function together. Grade first, rocks second, always.
Denver’s clay soil, freeze-thaw cycles, and intense summer storms challenge even well-designed drainage systems. Rock borders address these issues when installed correctly over graded soil with functioning gutters and downspouts.
Choose a stone based on your situation and budget. Crushed gravel provides excellent drainage and stability. River rock offers superior aesthetics. Both work effectively when paired with permeable fabric and adequate depth.
Walk around your home after the next rain. Note where water goes, where it pools, and where it flows freely. These observations guide better design decisions than generic advice. Use this guide to create a rock border that keeps your Denver home dry and beautiful for years.
Frequently asked questions (FAQs)
Why surround a foundation with dirt and rocks instead of just mulch or plants?
Rocks over graded soil move water away from foundations more effectively than mulch. Mulch absorbs moisture and attracts pests near foundation walls. Denver’s clay soil makes drainage critical, and rock borders provide the water management your foundation needs with less maintenance than organic materials.
What is the best rock for drainage around a house in Denver?
Three-quarter-inch crushed gravel works best for most Denver applications. The angular shape creates stability and drainage simultaneously. Washed gravel offers maximum percolation in high-flow areas. River rock looks attractive but shifts on slopes, so choose crushed gravel for reliable performance in clay soil and freeze-thaw conditions.
How deep should drainage rocks around a house be?
Install rock at 2 to 4 inches depth depending on stone size. Three inches of three-quarter-inch gravel provides adequate coverage and drainage for most situations. Depth below 2 inches allows weeds to reach soil easily and reduces effectiveness. Check annually and add rock when settling occurs.
Should I use river rock or gravel around my foundation?
Use crushed gravel on slopes and where drainage is the priority. River rock works on flat sections where appearance matters most. Many homeowners combine both: gravel for function alongside walls, river rock for aesthetics in front. Let your grading requirements guide the choice more than appearance.
Can rocks around a foundation cause problems?
Yes, rocks installed over poor grading trap water against foundations instead of directing it away. The border hides problems while moisture damages walls. Rocks without fabric allow weeds through spaces between stones. Denver’s freeze-thaw cycles lift improperly installed rock. Install correctly or wait until you can do it right.
Do I still need gutters if I have rock borders around the house?
Yes, functional gutters are essential regardless of rock borders. Gutters collect roof water and move it away through downspouts. Rock borders handle only surface water from rain falling around your house. Without gutters, roof runoff overwhelms borders and creates the foundation problems you’re preventing. Extend downspouts at least six feet from your house.
