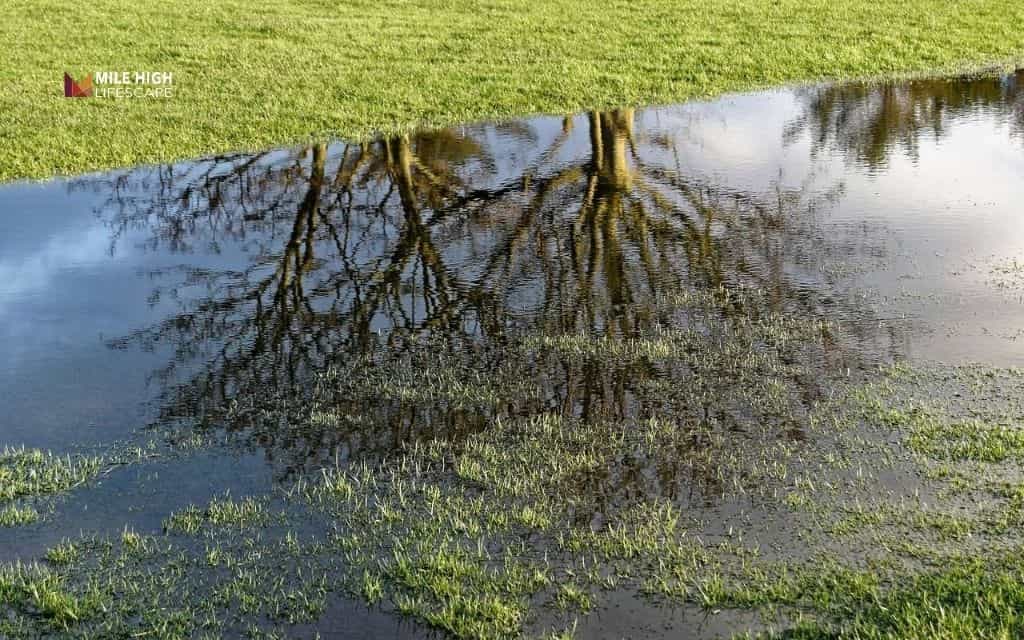
Denver properties face drainage challenges that other regions don’t. Our clay soil drains slowly. Water sits on the surface after storms instead of soaking in. Freeze-thaw cycles through winter create heaving and low spots where water collects. Snowmelt can dump weeks of precipitation in a few warm days. Slopes that look fine in July erode fast when April runoff hits.
Using rocks to divert water offers a solution that works. Rock channels water away from trouble spots. It protects your home. It prevents erosion. And it creates features that enhance your yard rather than hide problems under patches.
In this guide, we’ll walk through everything you need to know about using rocks to divert water effectively so you can apply it in your yard this year.
How water moves through your yard
Why Denver yards struggle with water
Soil conditions
Our Denver soil conditions create unique drainage challenges that homeowners in other regions simply don’t face. The heavy clay and naturally compacted soils common throughout the Front Range lead to extremely slow water infiltration. When rain or snowmelt hits the surface, it has nowhere to go except sideways, creating surface runoff that flows wherever gravity takes it.
Freeze-thaw cycles
Those freeze-thaw cycles we experience from October through May make things worse. As moisture in the soil freezes and thaws repeatedly, it creates small depressions and low spots that become water traps. Meanwhile, soil near foundations can heave and settle unevenly, changing your yard’s drainage patterns over time.
Gutters and downspouts
Your gutters and downspouts add another layer of complexity. They concentrate all the water from your roof into just a few discharge points. A typical Denver home might funnel thousands of gallons through two or three downspouts during a heavy storm, creating intense “problem zones” where water hammers the same spots repeatedly.
Good vs. bad drainage patterns
Good drainage patterns move water away from your foundation in controlled paths. Water flows gently across your yard, guided into swales, dry creek beds, or designated dispersion areas where it can soak into the soil safely and slowly. Plants get the moisture they need without drowning, and hardscapes stay dry and stable.
Bad drainage patterns let water pool near your house, threatening basement walls and foundation integrity. Water erodes slopes, carving gullies that get worse with every storm. Runoff races straight across walkways and driveways, creating ice hazards in winter and carrying soil and mulch onto concrete surfaces.
Why rock is so effective for drainage
Rock and gravel solve drainage problems through three key mechanisms.
- First, they create permeable pathways that allow water to flow freely while supporting foot traffic and preventing soil compaction.
- Second, they protect bare soil from the erosive force of flowing water, keeping your landscape intact during storms.
- Third, they slow and spread water instead of letting it concentrate into damaging torrents.
Unlike organic mulches that decompose or soil that compacts, rock maintains its drainage properties year after year.
A well-designed rock drainage feature can function effectively for decades with minimal maintenance, making it one of the best long-term investments you can make in your Denver landscape.
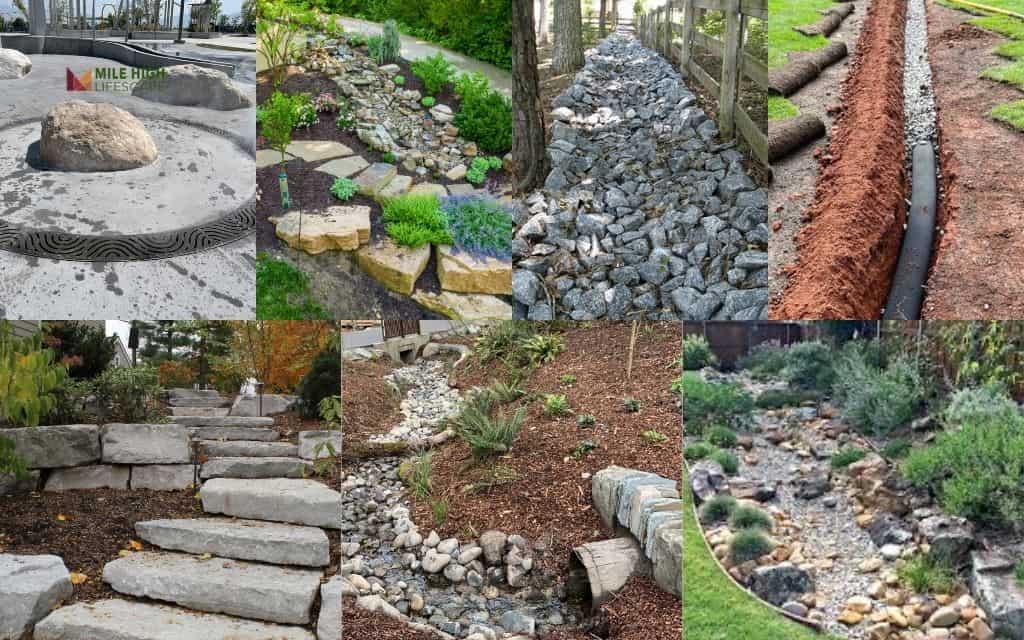
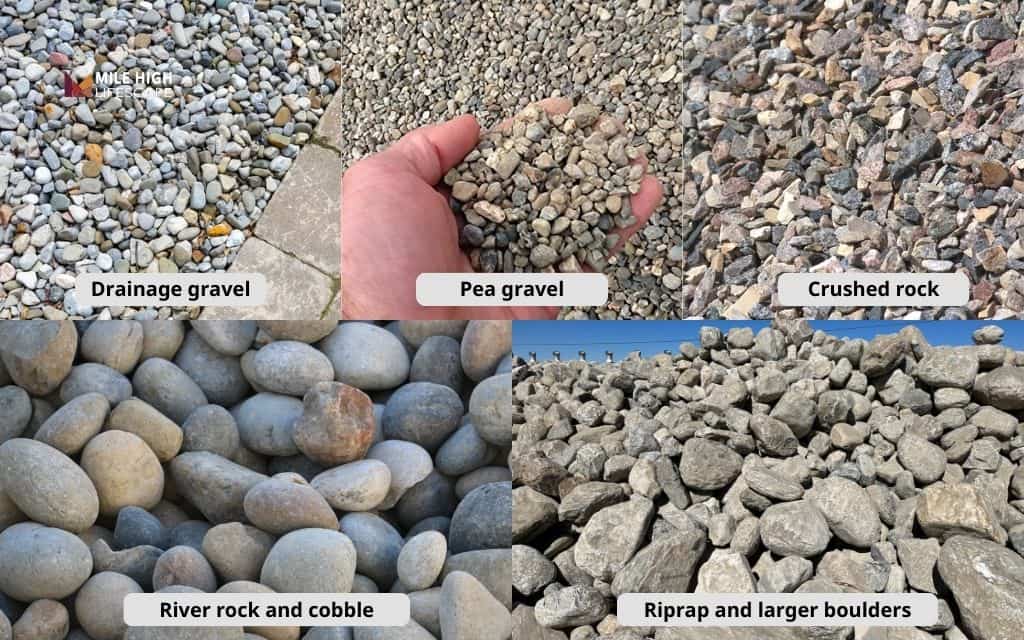
Best rocks for diverting water and controlling erosion
Drainage gravel
Drainage gravel (also called drain rock) is your go-to material for serious water movement. These washed, angular stones typically measure three-quarters of an inch to one and a half inches across.
The angular shape is crucial because it creates stable voids between stones where water can flow freely. You’ll use drainage gravel for French drains, underground trenches, and catch basins where efficient water movement is the priority.
Pea gravel
Pea gravel works well as a top layer in some applications. These small, rounded stones about three-eighths of an inch in diameter help guide water while reducing splashing. They’re ideal for topping French drains or lining gentle swales where you want a neat appearance.
However, their small size and smooth surfaces mean they can wash away in high-flow situations, so reserve them for lower-energy applications.
Crushed rock
Crushed rock or crushed stone gives you the best of both worlds: good drainage plus excellent stability. The angular fragments compact slightly to create a firm surface while still allowing water to percolate through.
Use crushed rock for pathways beside drainage features, for driveways that need to shed water, or anywhere you need people or vehicles to cross a drainage area safely.
River rock and cobble
River rock and cobble bring natural beauty to functional drainage features. These smooth, rounded stones range from 1 inch to 6 inches or more in diameter. They’re perfect for dry creek beds, decorative rings around downspouts, and erosion control along slopes.
When properly sized and placed, river rock can handle surprisingly high water flow while creating attractive landscape focal points that look like natural stream channels.
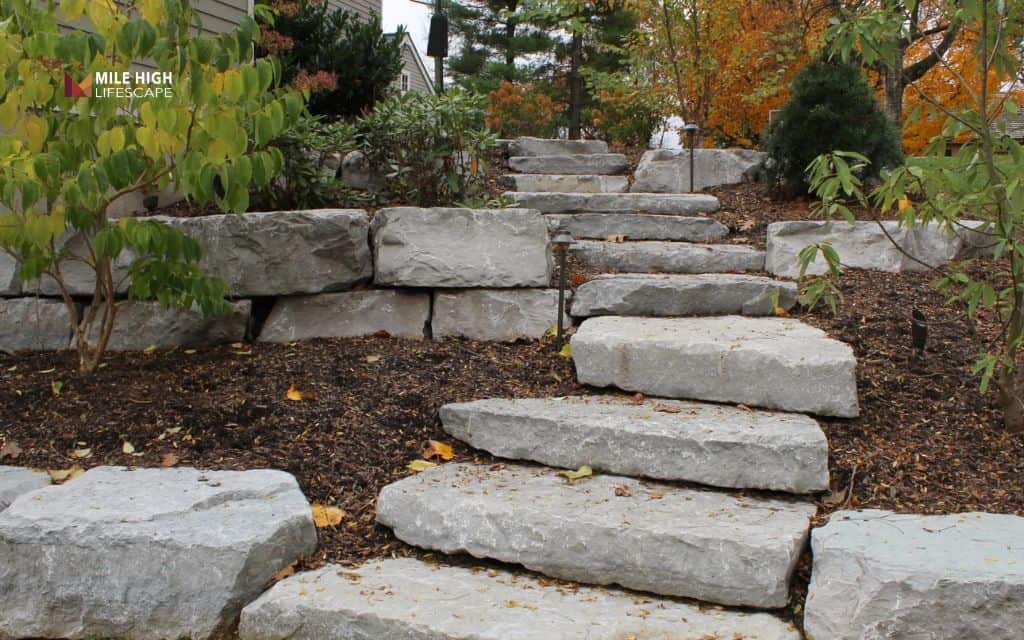
Riprap and larger boulders
Riprap and larger boulders tackle high-energy drainage situations where smaller stones would wash away.
Use stones ranging from softball size up to several hundred pounds for swale bends where water turns sharply, culvert outlets where flow exits pipes at high velocity, and steep slopes that need robust erosion protection.
Place riprap strategically, wedging stones together so they support each other and resist displacement. Where possible, combine riprap with plants growing between rocks for additional stabilization and improved aesthetics.
Using rocks to divert water: 7 proven Denver strategies
Rock splash pads under downspouts
The problem is simple but destructive: water blasting out of your downspout extension gouges holes in soil or mulch, splashing mud onto your siding and creating a perpetual mess.
The solution is widening the downspout discharge into a rock splash pad.
Start with a layer of drainage gravel about four inches deep and two to three feet in diameter at the discharge point. Top this with decorative river rock that matches your landscape aesthetic. The drainage gravel dissipates the water’s energy while allowing it to infiltrate or flow away gently. The river rock protects the drainage layer and prevents splashing.
For best results, grade the area around your splash pad so water flows away from your foundation. If you’re dealing with large volumes or poor soil drainage, connect your splash pad to a swale or dry creek bed.
Dry creek beds to reroute runoff
A dry creek bed mimics a natural stream channel, guiding water along a predetermined path during storms while adding beautiful, sculptural elements to your landscape during dry periods.
Create a shallow, sinuous channel that follows a gentle downhill grade, making it meander slightly rather than running in a straight line. This natural appearance also slows water flow and increases infiltration.
Line your creek bed with river rock, cobble, and accent boulders to create visual interest and erosion protection. Use larger cobbles and small boulders along the edges and at bends where water energy concentrates. Fill the center channel with medium river rock that can move slightly during peak flows without washing away entirely.

Rock-lined swales along property lines or driveways
Swales are shallow, graded depressions designed to move water slowly and allow infiltration along the way. Unlike ditches that rush water away as quickly as possible, swales embrace a gentler approach that works beautifully in residential landscapes.
Create your swale with a wide, gentle cross-section rather than a narrow, steep-sided channel. The center should be several inches lower than the edges, with gradual slopes on both sides. Line the lowest part of the swale with drainage gravel or river rock to prevent erosion and keep the channel open even when water isn’t flowing.
Swales work well along property lines to intercept runoff from upslope neighbors. Place them parallel to driveways to catch water before it crosses the pavement. Use them in large yards to create drainage networks that guide water from high points to dispersion areas.
French drains with rock fill
A French drain is an underground workhorse that intercepts and redirects groundwater or surface runoff.
You’ll dig a trench sloping gently toward your desired discharge point, typically at least twelve inches deep and six to eight inches wide. Line the trench with geotextile fabric that allows water through while keeping soil particles out.
French drains are excellent for intercepting groundwater before it flows downslope toward your house, drying out chronically soggy side yards where water concentrates between buildings, and relieving hydrostatic pressure behind retaining walls.
In Denver, where our water table can fluctuate dramatically between wet and dry periods, a well-placed French drain provides year-round protection.
Rock armor on slopes and erosion hotspots
Some locations experience such high water energy that they need heavy-duty protection.
Steep banks, gully mouths, culvert exits, and drain outlets all benefit from rock armor using riprap and larger stones. The goal is creating an interlocking surface that resists both water erosion and soil slumping.
For the best long-term results, plant tough groundcovers, ornamental grasses, or native shrubs between rocks wherever possible.
In Denver, consider species like kinnikinnick, blue grama grass, or rabbitbrush that can handle both wet periods and drought. The plant roots add extra stabilization while softening the appearance of the rock armor.
Rock channels beside walkways and patios
Water often ponds along the edges of walkways, patios, and driveways because these hardscapes alter natural drainage patterns.
A narrow rock channel running parallel to the hardscape provides an attractive, functional solution that catches this water and directs it to safe dispersion areas.
These rock channels are particularly valuable in Denver where freeze-thaw cycles can trap water against concrete, leading to ice buildup in winter or accelerated concrete deterioration from repeated freezing.
By keeping water moving and draining quickly, you protect your hardscape investments while preventing slippery ice hazards.
Rain garden inlets and outlets with rock
Rain gardens are designed to capture and infiltrate stormwater, but the points where water enters and exits these planted basins need special protection from erosion.
Use rock aprons at both inlets and outlets to slow water flow and stabilize the soil.
At the inlet where water rushes into your rain garden from a downspout, swale, or dry creek bed, create a broad, shallow apron of medium to large river rock. This dissipates the water’s energy before it enters the planted area, preventing the flow from carving channels through your carefully selected native plants and amended soil.
At the outlet where overflow exits during major storms, place another rock apron that transitions water smoothly to the next drainage feature or dispersal area. This prevents the rain garden’s edge from eroding and maintains the integrity of the basin over time.
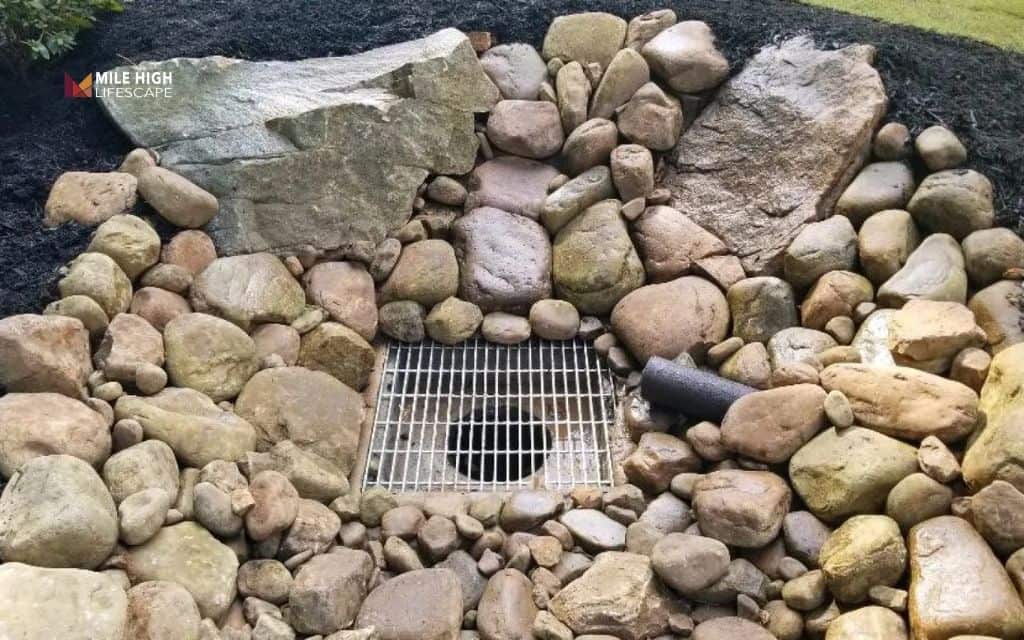
How to make a rock-lined catch basin or gravel pit for drainage
What is a gravel drainage pit / catch basin?
A gravel drainage pit, also called a rock-lined catch basin, is a subsurface “sump” filled with rock that temporarily stores stormwater and then releases it slowly into the surrounding soil.
Think of it as a dry well or infiltration basin that handles water where you can’t easily pipe it to the street or storm sewer system.
This technique works for isolated low spots in your yard where water naturally accumulates, at the endpoint of a dry creek bed where you need the water journey to end gracefully, and in areas with decent subsoil drainage where water can infiltrate if given time and space.
Planning your rock catch basin
Location is critical when building a catch basin with rocks.
Choose a site that’s downhill from your house so gravity naturally moves water toward it. Position the pit at least ten feet away from your foundation to ensure infiltrating water doesn’t create basement or crawl space moisture problems.
Respect property lines by keeping your drainage pit entirely on your own land, as directing water onto a neighbor’s property can create legal issues and neighborly friction.
If you’re managing runoff from a large roof section, driveway, or extensive hardscaped area, consider consulting local codes or a drainage professional to ensure your gravel drainage pit can handle the volume safely.
Step-by-step: Building a catch basin with rocks
Mark and dig the pit
Use spray paint or stakes and string to mark your pit’s perimeter. Dig to your planned depth, typically two to four feet deep for residential applications.
Deeper pits store more water, which helps during heavy storms, but always call 811 before digging to locate underground utilities.
If you’re digging deeper than three feet or working in unstable soil, slope the sides for safety or use proper shoring.
Add geotextile fabric
Line the sides and bottom of your excavation with landscape fabric or geotextile material. This fabric serves a crucial function: it allows water to seep out into the surrounding soil while preventing soil particles from migrating into your rock fill and gradually clogging the drainage voids. Overlap fabric seams by at least twelve inches to prevent soil intrusion at the joints.
Place coarse drainage rock
Fill most of your pit with washed drainage gravel, typically three-quarters of an inch to two inches in diameter.
Avoid rock with fines (rock dust and small particles) because these will reduce the void space where water needs to go.
As you fill, the fabric should stay in place against the pit walls. Fill to within six to twelve inches of the original ground surface, leaving room for your cover layer.
Install inlet and outlet (optional)
If you’re connecting your gravel pit for drainage to a dry creek bed, French drain, or pipe system, now is the time to make those connections.
A simple approach is running a drainage pipe into the top third of your rock fill, allowing water to enter and spread through the pit.
Some homeowners install a short vertical cleanout pipe that extends from the bottom of the pit to just above ground level, making it easy to flush debris or check drainage performance in the future.
Wrap and cover
Fold the excess geotextile fabric over the top of your drainage rock, creating a complete envelope that keeps soil out of the rock layer. Cover your wrapped pit with your choice of surface treatment.
For a completely hidden catch basin, add six inches of topsoil and mulch or sod over the fabric. For a visible drainage feature, top the fabric with more decorative river rock or gravel that matches your landscape aesthetic.
Common mistakes when using rocks to divert water
Mistake 1: Rock on flat, poorly graded soil
Placing rock on completely flat ground with no slope is one of the most common errors. Rock helps water move and infiltrate, but it can’t overcome the basic principle that water flows downhill. On flat or graded surfaces, rock can trap water in the void spaces instead of moving it away, creating mosquito breeding areas and prolonged wet conditions.
Mistake 2: Sending water to the wrong place
You solve your drainage problem only to create one somewhere else, perhaps worse than the original. Common mistakes include pushing water straight into your neighbor’s yard (which may violate local ordinances and will definitely damage neighborhood relations), directing flow onto sidewalks or driveways where it freezes into ice hazards in winter, or simply moving water from one poorly draining area to another spot with equally bad clay soil where it ponds again.
Mistake 3: Using the wrong rock size
Rock size profoundly affects drainage performance. Too small, and your rock washes away during high flows or compacts over time, losing its drainage capacity. River rock smaller than one inch tends to move easily in Denver’s occasional intense runoff events. Too large alone, and you create gaps that leave underlying soil exposed, defeating the erosion control purpose.
Mistake 4: Forgetting maintenance
Even rock drainage systems need occasional attention. Over time, leaves, pine needles, soil particles, and organic debris accumulate in rock channels and pits. This gradual clogging reduces drainage effectiveness and can eventually cause your system to fail during heavy storms when you need it most.
_______
Mile High Lifescape has solved drainage challenges across the Denver Metro area through expert landscape rock service. Our team understands what works in Colorado’s clay soil and semi-arid climate. We’ve installed rock-based drainage systems that protect foundations, prevent erosion, and enhance property value.
Conclusion
Using rocks to divert water effectively protects your foundation, prevents soil erosion, and eliminates muddy problem areas during Denver’s storms and snowmelt. Rock drainage features also add natural, attractive elements that fit well with xeriscape landscaping.
Start by observing your yard during the next rain or snowmelt. Note where water flows and pools. Pick one small project to begin – a downspout splash pad, a short dry creek bed, or a gravel pit for a persistent low spot. These single features often solve immediate problems while you learn what works for your specific property.
For larger drainage issues or if you’re uncertain about grading and sizing, Mile High Lifescape can design and install rock drainage solutions tailored to Denver’s clay soil and weather patterns.
Frequently asked questions (FAQs)
How do I start using rocks to divert water away from my foundation?
Extend downspouts at least 6 feet from your foundation using solid pipes or extensions. Add rock splash pads where water discharges. Grade soil to slope away from your house (minimum 1-2% slope). Connect splash pads to dry creek beds or swales that carry water to safe infiltration areas at least 10 feet from your foundation.
What’s the best type of gravel for a drainage gravel pit or rock catch basin?
Use washed drainage gravel (¾” to 1½” diameter) with no fines. Angular stones work better than rounded because they interlock and resist compaction. The void spaces between stones allow water to fill the pit during storms and infiltrate slowly afterward.
How deep should a gravel pit for drainage be?
Most residential gravel drainage pits are 2-4 feet deep. Three feet is typical for average applications. Deeper pits store more water during heavy storms. Always call 811 before digging to locate utilities. Width matters as much as depth – wider pits allow water to infiltrate through more soil surface area.
Can I build a rock-lined catch basin without a pipe, or do I need a full French drain?
Yes, you can build a simple catch basin without pipes. Dig a pit, line it with landscape fabric, fill with drainage gravel, and wrap the top. This works for isolated low spots or as endpoints for dry creek beds where soil drainage is adequate. Add pipes only when connecting from distant sources or when you need to move water to a storm drain because soil won’t absorb it.
What size rock should I use in a dry creek bed or rock swale?
Use 2-6″ river rock in the center channel where water flows. Place larger cobbles and boulders (6-12″) at curves and channel edges where erosion is most likely. Mixing sizes creates a natural appearance and better erosion resistance than uniform rock sizes.
Will using rocks to divert water increase mosquitoes or standing water issues?
No, if designed correctly. Rock drainage systems move and infiltrate water rather than trapping it. Water should drain through rock features within 24 hours after rain. If water stands longer, improve the grade or check for clogging debris. Properly functioning systems discourage mosquitoes by keeping water moving.
How much maintenance does a rock drainage system really need in Denver’s climate?
Clear leaves and debris from rock channels twice yearly (spring and fall) using a rake or leaf blower. This takes 1-2 hours per year for typical systems. Check catch basins annually and flush with a hose if drainage slows. Top up rock in high-wear areas every 3-5 years as needed.
