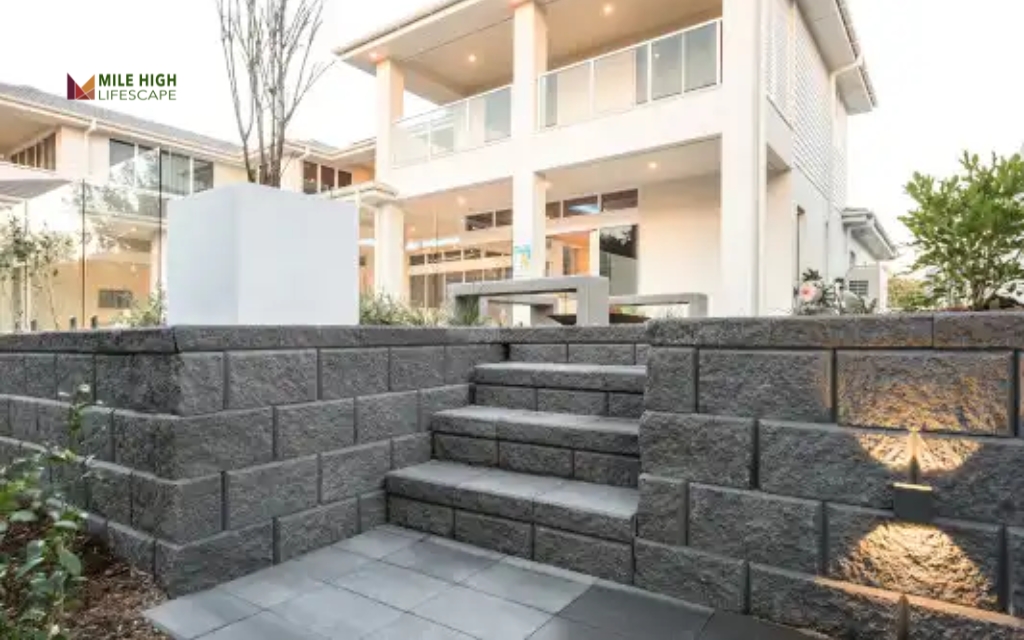
Retaining wall stairs transform sloped landscapes into functional, accessible spaces while preventing soil erosion. These integrated steps provide safe passage across elevation changes in your yard, creating both practical pathways and striking visual elements.
This guide walks you through the complete process of building retaining wall stairs—from initial measurements to finishing touches. You’ll learn which tools to gather, how to calculate dimensions, when to consider drainage, and signs that indicate you might need professional assistance. Follow these instructions to create durable, code-compliant stairs that enhance your property’s functionality and value.
At Mile High Lifescape, we’ve installed countless retaining wall stair systems throughout Denver’s varied topography. Our experience spans two decades of adapting designs to Colorado’s unique soil conditions and climate challenges. Contact us for a free quote on landscape services.
Understanding Retaining Wall Stairs
Retaining wall stairs integrate steps directly into a wall system that holds back soil on sloped terrain. Unlike freestanding steps, these structures serve dual purposes: containing earth while providing passage between different elevations. The wall component prevents erosion and slope failure, while the stairs create a navigable route up or down the incline.
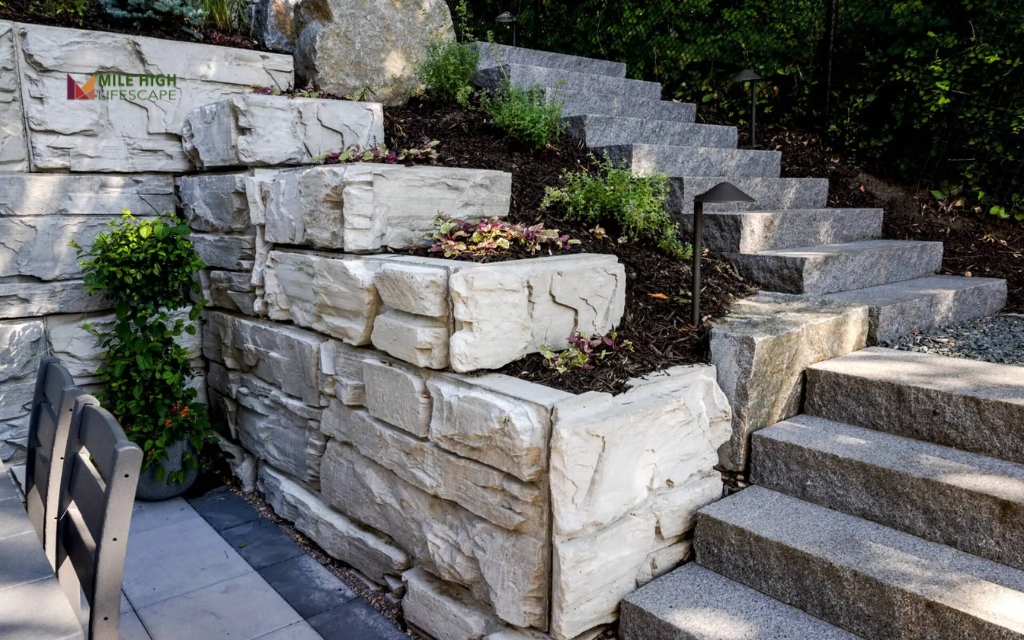
Homeowners typically install retaining wall stairs to solve specific landscape challenges. These structures excel in hillside gardens, terraced yards, steep driveways, or any transition between distinct elevation levels. Beyond pure utility, well-designed wall stairs create focal points that enhance outdoor spaces through thoughtful material selection and configuration.
Material options for retaining wall steps include:
- Concrete blocks (interlocking systems designed specifically for walls)
- Natural stone (flagstone, limestone, or granite)
- Timber (pressure-treated lumber or railroad ties)
- Brick or concrete pavers
Each material offers different benefits regarding durability, cost, and installation complexity. Concrete blocks provide consistency and relative simplicity for DIY projects. Natural stone delivers unmatched aesthetics but requires more skill to install properly. Timber offers affordability but typically has a shorter lifespan in Colorado’s climate.
Planning and Design Considerations
Permitting & Code Compliance
Before breaking ground, check Denver’s building regulations. Most jurisdictions require permits for retaining walls exceeding 4 feet in height or supporting significant loads. Contact your local building department to verify requirements specific to your area. Even for smaller projects, adhering to code ensures proper drainage, appropriate materials, and adequate structural support—factors that prevent future failures and liability issues.
Information document on retaining wall steps construction permits for Denver – Mile High City is here.
Slope Grade & Stair Geometry
Measure your slope’s rise (vertical height) and run (horizontal distance) to determine stair count and dimensions. Use a long level and tape measure for accurate readings. The ideal stair design maintains consistent riser heights between 6-8 inches and tread depths of 12-18 inches. For comfort and safety, avoid extreme variations in step dimensions throughout the staircase. Calculate total steps by dividing your total rise by your desired riser height.
Material Selection Tips
Choose materials based on your climate conditions, existing landscape elements, and long-term durability needs. Interlocking concrete blocks offer simplicity for DIY installation and consistent dimensions. Natural stone provides superior aesthetics but requires more skill to install properly. Consider weight capacity requirements if the stairs will support heavy foot traffic or equipment. Select materials that complement your home’s architecture and other hardscape features.
Drainage Planning
Proper drainage prevents water pressure buildup behind walls—the primary cause of retaining wall failure. Install drainage gravel (3/4-inch clean stone) behind the wall with perforated pipe at the base to direct water away from the structure. For walls taller than 3 feet, incorporate additional drainage measures such as weep holes or drainage matrix materials. Position the entire stair system to direct surface water away from both the top and bottom of the stairs.
Element | Ideal Measurement | Notes |
| Riser height | 6–8 inches | Keep consistent throughout staircase |
| Tread depth | 12–18 inches | Deeper treads provide more comfortable steps |
| Stair width | Minimum 36 inches | Wider stairs (48-60″) create more impressive entrances |
| Wall block setback | 1 inch per vertical foot | Creates proper lean-back for structural integrity |
| Base depth | 6 inches minimum | Deeper for unstable soils or taller walls |
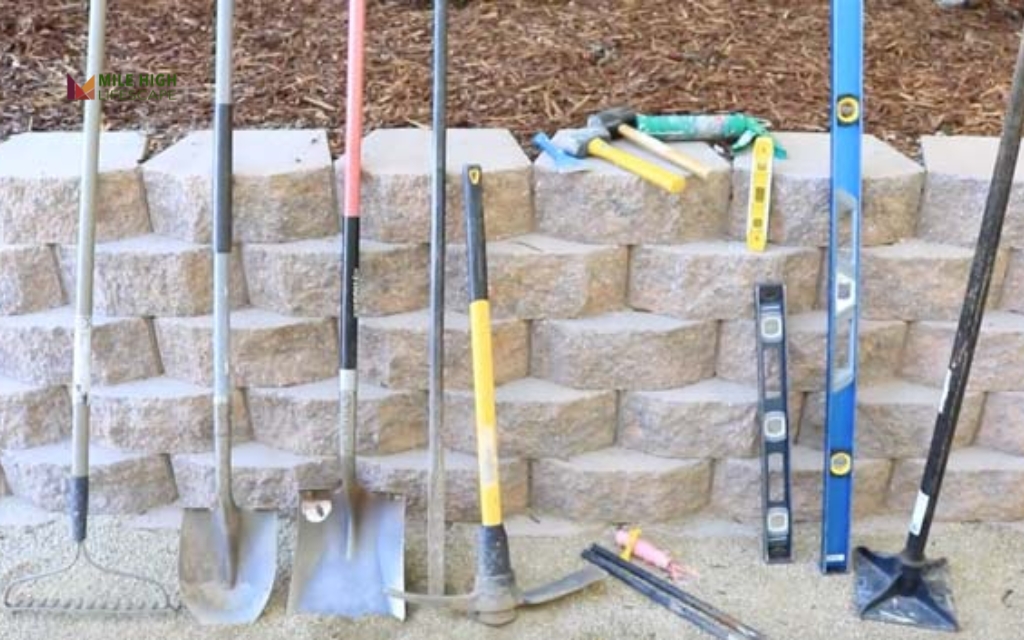
Tools and Materials Checklist
Essential Tools
- Shovel and pick (for excavation)
- Wheelbarrow (material transport)
- Tape measure and string line
- 4-foot and 2-foot levels
- Rubber mallet
- Line level or laser level
- Plate compactor or hand tamper
- Dead blow hammer
- Square
- Marking paint and stakes
- Trowel for adhesive application
Required Materials
- Retaining wall blocks (calculate based on dimensions and quantity)
- Capstones for top course
- Gravel for base (crushed stone or road base)
- Drainage aggregate (3/4-inch clean stone)
- Landscape fabric (geotextile)
- Perforated drainage pipe
- Masonry adhesive
- Paver base or crushed stone for treads
- Geogrid reinforcement (for walls over 3 feet)
- Backfill material
Safety Equipment
- Work gloves
- Safety glasses
- Steel-toe boots
- Knee pads
- Dust mask (for cutting blocks)
- Back brace (for lifting heavy materials)
Step-by-Step Guide to Building Retaining Wall Stairs
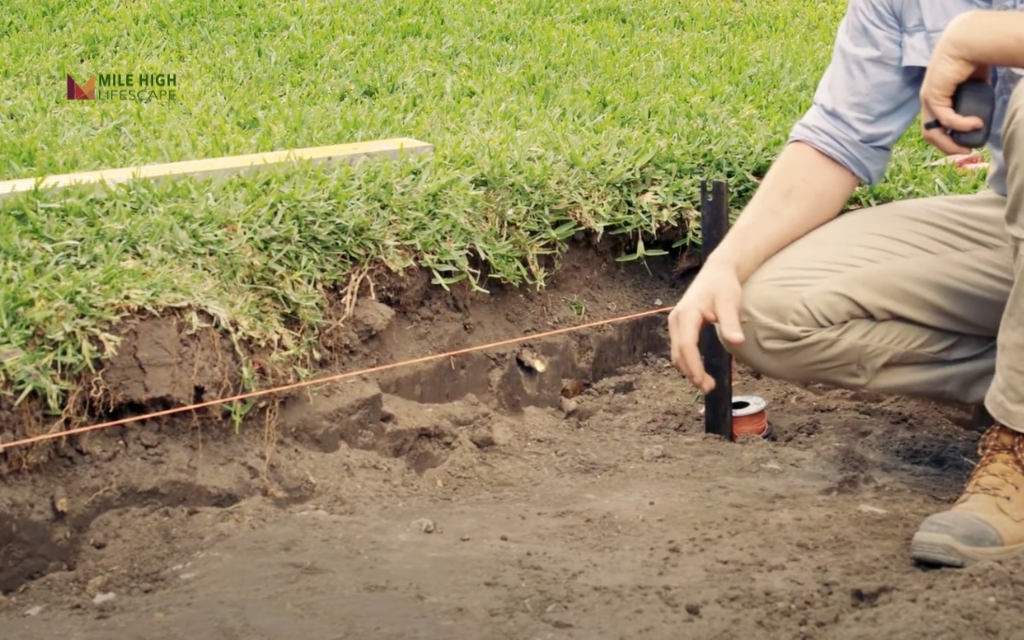
Step 1: Site Preparation
Mark the stair pathway using landscape marking paint and stakes with string to visualize the final layout. Remove all vegetation, topsoil, and debris within the marked area to a depth of 8-12 inches, extending at least 12 inches beyond the planned wall edges. Slope the excavation slightly toward the proposed drainage exit point. For walls exceeding 3 feet in height, excavate deeper to accommodate proper base material.
Use a plate compactor to firm up the subgrade soil until it feels solid underfoot. This foundation layer must remain undisturbed and level to prevent future settling. If you encounter unstable soil conditions (excessively wet areas, clay, or loose sand), excavate an additional 4-6 inches and replace with compacted crushed stone. Take time during this stage to identify any utility lines that might interfere with your dig.
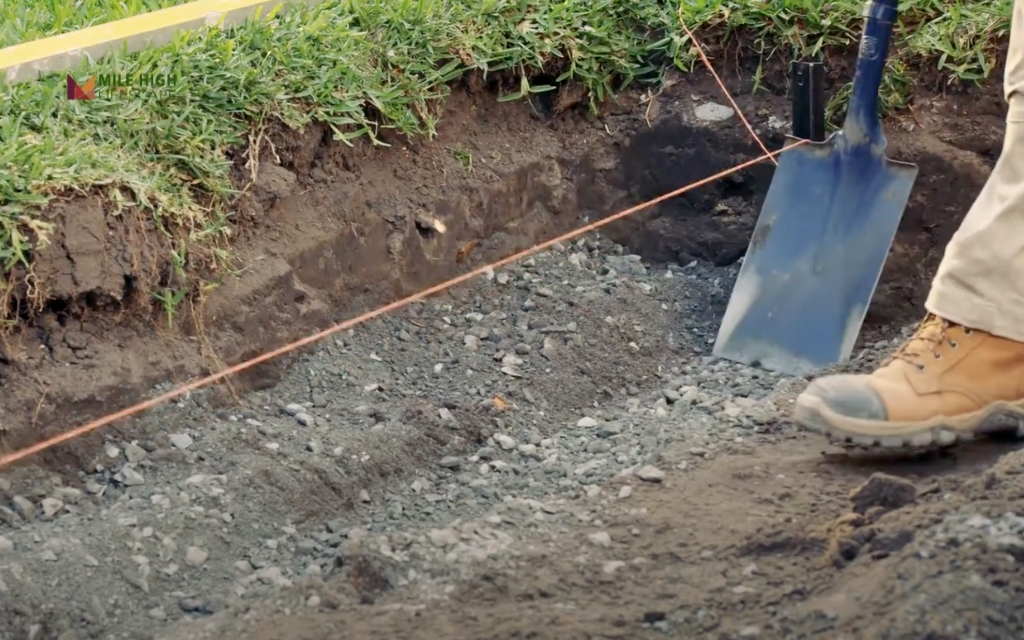
Step 2: Dig and Build the Base Trench
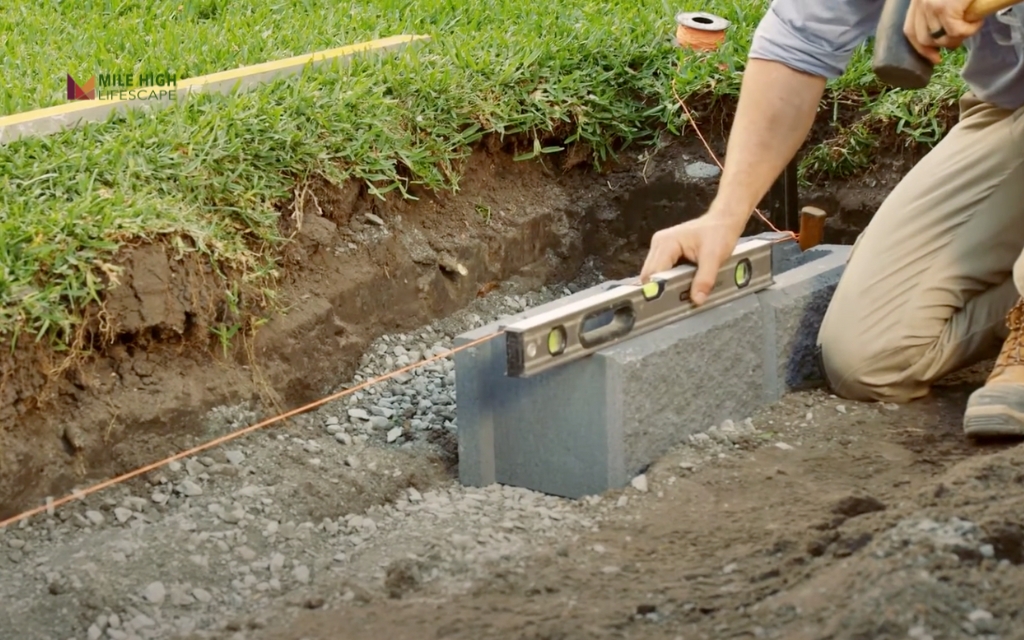
Excavate a level trench at the bottom of the slope for the first course of wall blocks. The trench width should measure twice the depth of your blocks (typically 12-16 inches) to provide adequate support. Dig 6 inches deeper than your block height to accommodate the gravel base. Ensure the trench bottom maintains consistent level across its width and length.
Add 4-6 inches of compacted road base gravel to the trench, spreading it evenly in 2-inch layers and compacting each layer thoroughly before adding the next. The final gravel surface must be perfectly level, as this foundation determines the alignment of all subsequent courses. Use a long straight board with a level on top to verify flatness across the entire base. Take extra time to perfect this foundation layer—it prevents future settling and alignment issues.
Step 3: Lay the First Course of Wall Blocks
Set the first course of retaining wall blocks directly onto the leveled gravel base. Position each block so it sits perfectly level from front to back and side to side, using your 2-foot level to check repeatedly. For projects using interlocking blocks, maintain ⅛-inch joints between units, allowing for slight adjustments. Tap blocks into position with a rubber mallet rather than forcing them.
This bottom course establishes the baseline for your entire stair system. Verify alignment from multiple angles and ensure blocks position precisely according to your marked layout. For curved stairs, use blocks with tapered sides or cut standard blocks to achieve the desired radius. Spend extra time on this foundation course—even minor misalignments now multiply into major problems as you build upward.
Step 4: Stack and Backfill Successive Wall Layers
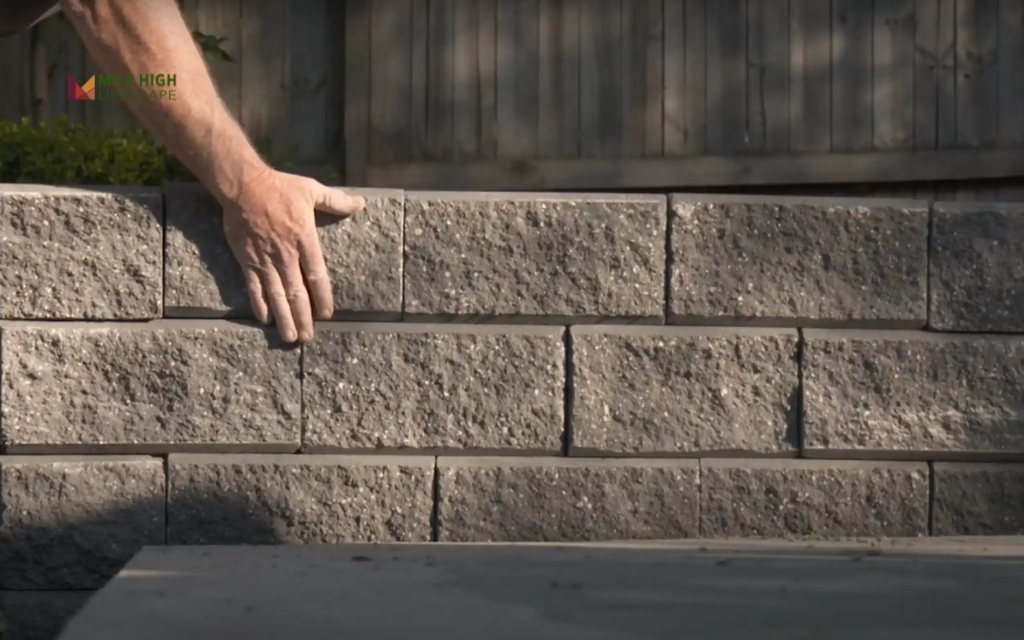
Continue stacking blocks up the slope, following the manufacturer’s recommended setback per course (typically 1/2 to 1 inch per vertical foot of wall). Offset the vertical joints by half a block length from the course below to create a structurally sound running bond pattern. Install the blocks with the built-in lip or ridge facing downward to lock into the course below.
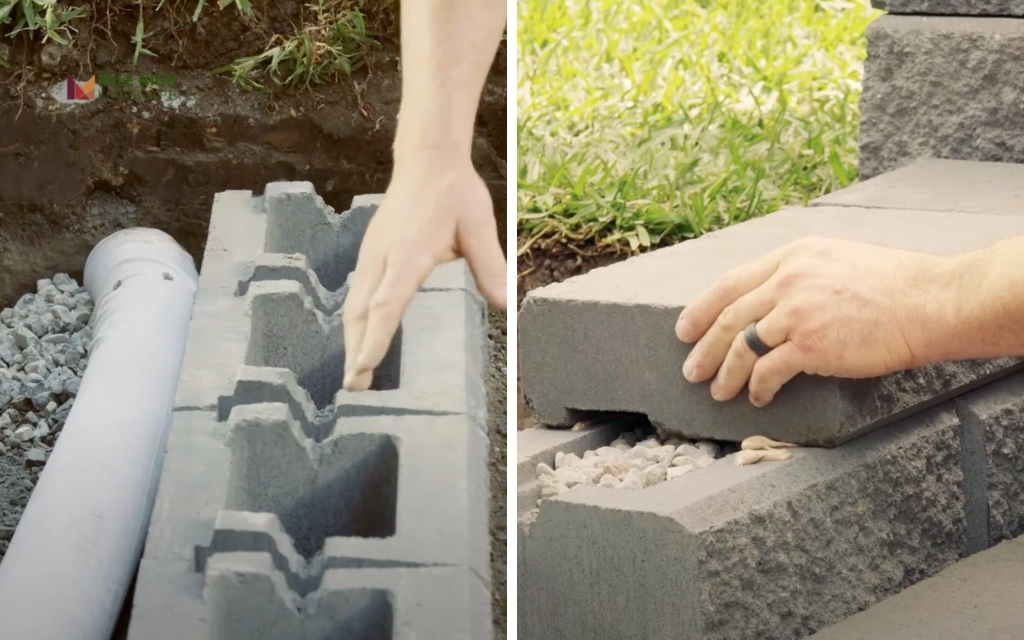
After placing each new course, backfill behind the wall with crushed drainage gravel to a depth of at least 12 inches from the wall face. Compact this material in 4-inch lifts using a hand tamper. For walls exceeding 24 inches in height, incorporate geogrid reinforcement between specified courses according to manufacturer recommendations, extending it into the slope at least 24 inches. This reinforcement mesh integrates the wall structure with the surrounding soil to prevent outward pressure failure.
Step 5: Build Stair Tread Support Walls
At each stair rise location, place wall blocks perpendicular to the main retaining wall to form the side edges of each step. Position these perpendicular blocks so their vertical faces align flush with the front edge of where the tread will sit. Secure these side blocks to the main wall blocks using masonry adhesive to prevent shifting.
For taller steps, stack blocks two high, applying masonry adhesive between courses for stability. Ensure each stair riser maintains a consistent height of 6-8 inches throughout the staircase. Check alignment using a level and square to verify perpendicular positioning relative to the main wall. These side walls create containment for each tread material and provide visual definition to your staircase.
Step 6: Fill and Compact the Stair Treads
Fill the area behind each riser and between the side walls with compacted crushed stone or gravel to within 2-3 inches of the final tread height. Ensure each tread maintains a minimum depth of 12 inches, preferably 14-18 inches for comfortable foot placement. Create a slight slope (approximately 1/8 inch per foot) toward the front of each tread to prevent water pooling.
Compact the base material using a hand tamper until firm. Add a final layer of paver base or fine crushed stone, compact again, and level to prepare for the finished tread surface. Install your chosen tread material—concrete pavers, natural stone slabs, or cast concrete caps—setting them in a thin bed of paver sand for fine adjustments. Apply masonry adhesive beneath each tread piece to prevent future movement and create a permanent bond.
Step 7: Secure the Final Course and Finishing Details
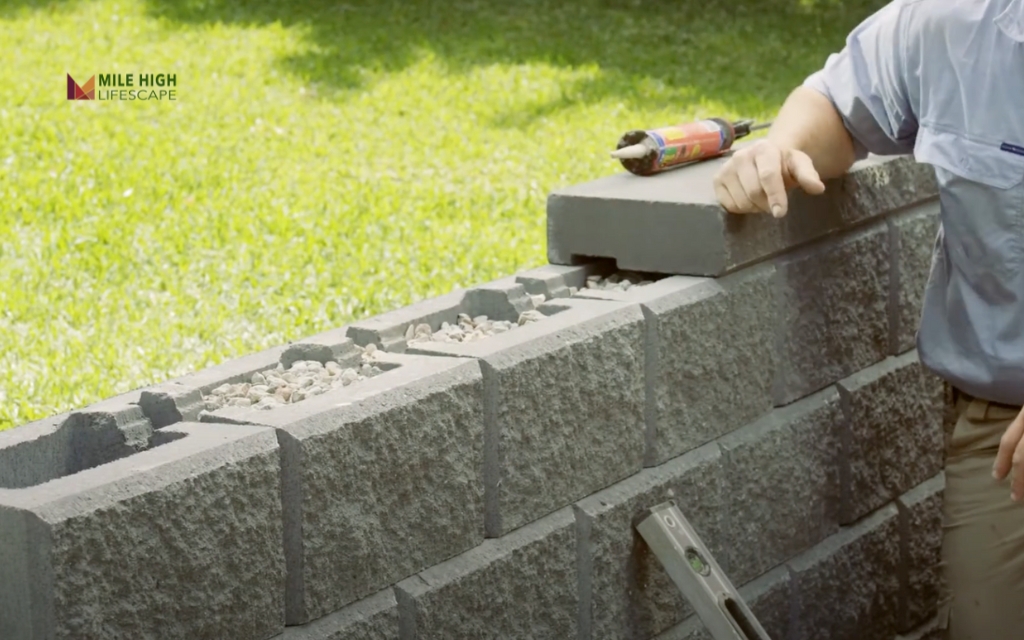
Apply masonry adhesive to the top course of each wall section and install capstones or decorative top blocks. These finishing pieces should overhang the wall face by 1-2 inches and completely cover the top blocks. Press each capstone firmly into the adhesive bed and check for level positioning across the entire width.
Backfill and grade the surrounding area to direct water away from both the top and bottom of the staircase. Add topsoil at least 6 inches back from the edge of the stairs and slope it gradually away from the structure. Install landscape fabric between the soil and any exposed drainage aggregate to prevent soil migration into the drainage system. Complete the project by adding plants near the stairs for erosion control and visual integration with the surrounding landscape.
Common Mistakes to Avoid When Building Retaining Wall Steps
- Skipping proper base preparation: Inadequate base depth or compaction leads to settling and eventual stair failure. Always excavate to appropriate depth and compact thoroughly.
- Inconsistent riser heights: Varying step heights create trip hazards and uncomfortable navigation. Measure repeatedly to maintain uniform dimensions throughout the staircase.
- Neglecting drainage systems: Omitting drainage gravel and perforated pipe behind the wall invites water pressure buildup and potential wall collapse. Proper drainage constitutes at least 15% of your total project effort but prevents 90% of future problems.
- Insufficient wall reinforcement: Failing to incorporate geogrid in walls taller than 3 feet compromises structural integrity. Follow manufacturer guidelines for reinforcement spacing.
- Improper block placement: Rushing block alignment creates visible irregularities and structural weaknesses. Take time to level and position each block precisely before proceeding.
- Overlooking freeze-thaw cycles: In Denver’s climate, failing to account for seasonal ground movement can damage stairs. Incorporate proper base depth and drainage to minimize frost heave.
Maintenance and Longevity Tips for Retaining Wall Stair
- Conduct annual inspections of your retaining wall stairs each spring to identify and address minor issues before they become major problems. Check for signs of settling or shifting blocks, particularly after winter freeze-thaw cycles common in Denver. Examine joints between blocks for widening gaps that might indicate movement within the wall structure.
- Address vegetation management promptly to preserve structural integrity. Remove any woody plants that establish roots near or within the wall, as these can create pressure and displacement over time. Maintain a 2-foot plant-free zone immediately adjacent to the wall while using ground covers or shallow-rooted plants further back to prevent erosion.
- Drainage system maintenance proves crucial for long-term performance. Clear debris from the top and bottom of the stairs regularly. After heavy rainstorms, verify that water flows properly through drainage channels and exits appropriately at the base of the wall. If you notice water pooling near the wall or saturated soil, investigate and remedy drainage issues immediately.
- Re-secure loose capstones or pavers annually using fresh masonry adhesive. Fill any eroded areas behind the wall with additional drainage material to maintain proper support. For walls with significant height, consider professional inspection every 3-5 years to identify potential structural concerns before failure occurs.
Why Hire Mile High Lifescape for Your Retaining Wall Stairs?
Mile High Lifescape brings two decades of specific experience with Denver’s unique soil conditions, elevation changes, and climate challenges to every retaining wall project. Our team understands how Colorado’s freeze-thaw cycles affect hardscape structures and incorporates appropriate accommodations into every design. This local expertise translates into retaining wall stairs that maintain structural integrity through seasonal fluctuations.
Our professional installation ensures complete code compliance and structural integrity, particularly important for walls exceeding four feet in height that require engineering approval. We handle permitting processes, drainage calculations, and reinforcement requirements that often confuse homeowners attempting DIY installation. Our comprehensive approach integrates proper water management—the most critical factor in retaining wall longevity.
“Mile High Lifescape transformed our sloped backyard from unusable space into a beautiful terraced garden with stone stairs. Five years later, everything remains perfectly level despite our challenging soil conditions.” – Michael Davis, Westminster homeowner
While DIY projects might appear cost-effective initially, professional installation often proves more economical long-term by preventing expensive repairs. Our team completes most stair projects in 2-3 days with warranty-backed workmanship. Contact us for a free on-site consultation to discuss how retaining wall stairs can enhance your property’s functionality and value.

Frequently Asked Questions (FAQs)
Do I need a permit to build retaining wall stairs in Denver?
Denver requires permits for retaining walls exceeding 4 feet in height measured from the bottom of the footing to the top of the wall, or for any wall supporting a surcharge (additional weight) like a driveway or structure. Even for smaller projects, check with Denver’s building department as requirements vary by specific neighborhood and zoning area. We handle all permitting processes for our clients.
Can retaining wall stairs be added to an existing wall?
Adding stairs to an existing retaining wall presents significant challenges and risks to wall integrity. The process requires careful excavation behind the wall and often necessitates partial reconstruction to ensure proper support for the stairs. For walls under three years old with proper drainage systems, modification may be possible. Consult with a professional to evaluate your specific situation before attempting modifications.
What’s the best material for long-lasting outdoor stairs in Colorado?
For Denver’s climate, concrete block systems specifically designed for retaining walls provide the optimal balance of durability, cost-effectiveness, and DIY-friendliness. Natural stone offers superior aesthetics but requires more skill to install properly. Avoid railroad ties or standard pressure-treated lumber, as these typically deteriorate within 7-10 years in our climate. Whatever material you choose, proper drainage installation matters more than the surface material for ensuring longevity.
How deep should the base for retaining wall stairs be?
The base for retaining wall stairs should extend at least 6 inches below the frost line in your area. For Denver, this typically means a minimum depth of 12-18 inches with 6 inches of compacted gravel. Walls exceeding 3 feet in height require deeper foundations proportional to wall height. Poor soil conditions necessitate additional base depth—clay soils may require twice the standard depth with additional drainage accommodations.
How much does it cost to build retaining wall stairs?
Professional retaining wall stair installation typically costs between $80-150 per square foot in the Denver area, depending on materials selected, site accessibility, and complexity. DIY projects usually run $35-70 per square foot for materials alone. A standard 4-foot wide staircase with 5 steps and 3-foot retaining walls on each side ranges from $4,000-8,000 for professional installation. Remember that proper installation prevents far more costly repairs or reconstruction in the future.

